Table of Contents
Basics
- 1. Introduction
- 2. What is Node.js?
- 3. Simple messaging application
- 4. V8 and Javascript gotchas
- 5. Arrays, Objects, Functions and JSON
- 6. Javascript OOP by example
- 7. Control flow
Node.js libraries and patterns
- 8. An overview of Node, Modules and npm
- 9. Fundamentals: Timers, EventEmitters, Streams and Buffers
- 10. HTTP & HTTPS
- 11. File system
Specialized topics
1. Introduction
Thanks for visiting my book site!
My ideal book is short, comprehensive and interesting.
In order to learn Node, you need to learn how to write code - not how to use a 3rd party library or a set of spells. I will recommend a few libraries, but the focus is on writing code yourself.
Whenever I cover an API, I will do what I can to include examples and snippets that I have found useful myself. There are many parts that I would like to expand on, but I have to balance writing with a lot of other projects.
Update: Jan 2012
First of all, thank you for everyone who's read the book, commented, followed me on Github/Twitter or linked to the book site! You keep me motivated to write, so thank you.
The update includes:
- Coverage of Comet and Socket.io (Chapter 13)
- Coverage of basic OOP patterns in JS (Chapter 6)
- Added chapter summaries at the top of each chapter
- Single page version of the book (e.g. for converting to PDF or some other format)
I've started working on a follow up book, which will cover more advanced topics - such as testing, ES6 and some topics related to single page applications.
To make time for writing that book, I'm dropping the planned chapters on MVC. This topic has gotten some pretty good coverage elsewhere online; and I'd prefer to be working on more advanced topics next.
About me
Hi, I'm Mikito (mixu).
In short: my blog, my Node.js tiling window manager for X11 and my Github and Twitter, Linkedin.
Please leave comments and corrections using Disqus. I'll update the book, though I'm generally too busy to offer personal assistance.
This book is available for free, but what I've written remains mine. Ask me if you want to do something with it.
2. What is Node.js?
- describe the Node.js event loop and the premise behind asynchronous I/O
- go through an example of how context switches are made between V8 and Node
Node - or Node.js, as it is called to distinguish it from other "nodes" - is an event-driven I/O framework for the V8 JavaScript engine. Node.js allows Javascript to be executed on the server side, and it uses the wicked fast V8 Javascript engine which was developed by Google for the Chrome browser.
The basic philosophy of node.js is:
- Non-blocking I/O - every I/O call must take a callback, whether it is to retrieve information from disk, network or another process.
- Built-in support for the most important protocols (HTTP, DNS, TLS)
- Low-level. Do not remove functionality present at the POSIX layer. For example, support half-closed TCP connections.
- Stream everything; never force the buffering of data.
Node.js is different from client-side Javascript in that it removes certain things, like DOM manipulation, and adds support for evented I/O, processes, streams, HTTP, SSL, DNS, string and buffer processing and C/C++ addons.
Let's skip the boring general buzzword bingo introduction and get to the meat of the matter - how does node run your code?
The Event Loop - understanding how Node executes Javascript code
The event loop is a mechanism which allows you to specify what happens when a particular event occurs. This might be familiar to you from writing client-side Javascript, where a button might have an onClick event. When the button is clicked, the code associated with the onClick event is run. Node simply extends this idea to I/O operations: when you start an operation like reading a file, you can pass control back to Node and have your code run when the data has been read. For example:
// read the file /etc/passwd, and call console.log on the returned data
fs.readFile('/etc/passwd', function(err, data){
  console.log(data);
});
You can think of the event loop as a simple list of tasks (code) bound to events. When an event happens, the code/task associated with that event is executed.
Remember that all of your code in Node is running in a single process. There is no parallel execution of Javascript code that you write - you can only be running a single piece of code at any time. Consider the following code, in which:
- We set a function to be called after 1000 milliseconds using setTimeout() and then
- start a loop that blocks for 4 seconds.
What will happen?
// set function to be called after 1 second
setTimeout(function() {
   console.log('Timeout ran at ' + new Date().toTimeString());
}, 1000);

// store the start time
var start = new Date();
console.log('Enter loop at: '+start.toTimeString());

// run a loop for 4 seconds
var i = 0;
// increment i while (current time < start time + 4000 ms)
while(new Date().getTime() < start.getTime() + 4000) {
   i++;
}
console.log('Exit loop at: '
            +new Date().toTimeString()
            +'. Ran '+i+' iterations.');
Because your code executes in a single process, the output looks like this:
Enter loop at: 20:04:50 GMT+0300 (EEST)
Exit loop at: 20:04:54 GMT+0300 (EEST). Ran 3622837 iterations.
Timeout ran at 20:04:54 GMT+0300 (EEST)
Notice how the setTimeout function is only triggered after four seconds. This is because Node cannot and will not interrupt the while loop. The event loop is only used to determine what to do next when the execution of your code finishes, which in this case is after four seconds of forced waiting. If you have a CPU-intensive task that takes four seconds to complete, then a Node server would not be able to respond to other requests during those four seconds, since the event loop is only checked for new tasks once your code finishes.
Some people have criticized Node's single process model because it is possible to block the current thread of execution like shown above.
However, the alternative - using threads and coordinating their execution - requires somewhat intricate coding to work and is only useful if CPU cycles are the main bottleneck. In my view, Node is about taking a simple idea (single-process event loops), and seeing how far one can go with it. Even with a single process model, you can move CPU-intensive work to other background processes, for example by setting up a queue which is processed by a pool of workers, or by load balancing over multiple processes. If you are performing CPU-bound work, then the only real solutions are to either figure out a better algorithm (to use less CPU) or to scale to multiple cores and multiple machines (to get more CPU's working on the problem).
The premise of Node is that I/O is the main bottleneck of many (if not most) tasks. A single I/O operation can take millions of CPU cycles, and in traditional, non-event-loop-based frameworks the execution is blocked for that time. In Node, I/O operations such as reading a file are performed asynchronously. This is simply a fancy way of saying that you can pass control back to the event loop when you are performing I/O, like reading a file, and specify the code you want to run when the data is available using a callback function. For example:
setTimeout(function() {
   console.log('setTimeout at '+new Date().toTimeString());
}, 1000);

require('fs').readFile('/etc/passwd', function(err, result) {
  console.log(result);
} );
Here, we are reading a file using an asynchronous function, fs.readFile(), which takes as arguments the name of the file and a callback function. When Node executes this code, it starts the I/O operation in the background. Once the execution has passed over fs.readFile(), control is returned back to Node, and the event loop gets to run.
When the I/O operation is complete, the callback function is executed, passing the data from the file as the second argument. If reading the file takes longer than 1 second, then the function we set using setTimeout will be run after 1 second - before the file reading is completed.
In node.js, you aren’t supposed to worry about what happens in the backend: just use callbacks when you are doing I/O; and you are guaranteed that your code is never interrupted and that doing I/O will not block other requests.
Having asynchronous I/O is good, because I/O is more expensive than most code and we should be doing something better than just waiting for I/O. The event loop is simply a way of coordinating what code should run during I/O, which executes whenever your code finishes executing. More formally, an event loop is “an entity that handles and processes external events and converts them into callback invocations”.
By making calls to the asynchronous functions in Node’s core libraries, you specify what code should run once the I/O operation is complete. You can think of I/O calls as the points at which Node.js can switch from executing one request to another. At an I/O call, your code saves the callback and returns control to the Node runtime environment. The callback will be called later when the data is available.
Of course, on the backend - invisible to you as a Node developer - may be thread polls and separate processes doing work. However, these are not explicitly exposed to your code, so you can’t worry about them other than by knowing that I/O interactions e.g. with the database, or with other processes will be asynchronous from the perspective of each request since the results from those threads are returned via the event loop to your code. Compared to the non-evented multithreaded approach (which is used by servers like Apache and most common scripting languages), there are a lot fewer threads and thread overhead, since threads aren’t needed for each connection; just when you absolutely positively must have something else running in parallel and even then the management is handled by Node.js.
Other than I/O calls, Node.js expects that all requests return quickly; e.g. CPU-intensive work should be split off to another process with which you can interact with as with events, or by using an abstraction such as WebWorkers (which will be supported in the future). This (obviously) means that you can’t parallelize your code without another process in the background with which you interact with asynchronously. Node provides the tools to do this, but more importantly makes working in an evented, asynchronous manner easy.
Example: A look at the event loop in a Node.js HTTP server
Let’s look at a very simple Node.js HTTP server (server.js):
var http = require('http');
var content = '<html><body><p>Hello World</p><script type=”text/javascript”'
    +'>alert(“Hi!”);</script></body></html>';
http.createServer(function (request, response) {
   response.end(content);
}).listen(8080, 'localhost');
console.log('Server running at http://localhost:8080/.');
You can run this code using the following command:
node server.jsIn the simple server, we first require the http library (a Node core library). Then we instruct that server to listen on port 8080 on your computer (localhost). Finally, we write a console message using console.log().
When the code is run, the Node runtime starts up, loads the V8 Javascript engine which runs the script. The call to http.createServer creates a server, and the listen() call instructs the server to listen on port 8080. The program at the console.log() statement has the following state:
[V8 engine running server.js]
[Node.js runtime]
After the console message is written, control is returned to the runtime. The state of the program at that time is stored as the execution context “server.js”.
[Node.js runtime (waiting for client request to run callback) ]
The runtime check will check for pending callbacks, and will find one pending callback - namely, the callback function we gave to http.createServer(). This means that the server program will not exit immediately, but will wait for an event to occur.
When you navigate your browser to http://localhost:8080/, the Node.js runtime receives an event which indicates that a new client has connected to the server. It searches the internal list of callbacks to find the callback function we have set previously to respond to new client requests, and executes it using V8 in the execution context of server.js.
[V8 engine running the callback in the server.js context]
[Node.js runtime]
When the callback is run, it receives two parameters which represent the client request (the first parameter, request), and the response (the second parameter). The callback calls response.end(), passing the variable content and instructing the response to be closed after sending that data back. Calling response.end() causes some core library code to be run which writes the data back to the client. Finally, when the callback finishes, the control is returned back to the Node.js runtime:
[Node.js runtime (waiting for client request to run callback)]
As you can see, whenever Node.js is not executing code, the runtime checks for events (more accurately it uses platform-native API’s which allow it to be activated when events occur). Whenever control is passed to the Node.js runtime, another event can be processed. The event could be from an HTTP client connection, or perhaps from a file read. Since there is only one process, there is no parallel execution of Javascript code. Even though you may have several evented I/O operations with different callbacks ongoing, only one of them will have it's Node/Javascript code run at a time (the rest will be activated whenever they are ready and no other JS code is running).
The client (your web browser) will receive the data and interpret it as HTML. The alert() call in the Javascript tag in the returned data will run in your web browser, and the HTML containing “Hello World” will be displayed. It is important to realize that just because both the server and the client are running Javascript, there is no “special” connection - each has it’s own Javascript variables, functions and context. The data returned from the client request callback is just data and there is no automatic sharing or built-in ability to call functions on the server without issuing a server request.
However, because both the server and the client are written in Javascript, you can share code. And even better, since the server is a persistent program, you can build programs that have long-term state - unlike in scripting languages like PHP, where the script is run once and then exits, Node has it’s own internal HTTP server which is capable of saving the state of the program and resuming it quickly when a new request is made.
3. Simple messaging application
- specify a simple messaging application that uses long polling
- build a long polling server using Node and
- build a simple messaging client using jQuery
Let’s jump right in and do something with Node.js. We will be implementing a simple chat-type application using long polling. In our example, we will use simple, manual techniques to get a server up and running quickly. Routing, file serving and error handling are topics which we will expand upon in the later chapters.
Long polling is a simple technique for reading data from a server. The client browser makes a normal request, but the server delays responding if it does not have any new data. Once new information becomes available, it is sent to the client, the client does something with the data and then starts a new long polling request. Thus the client always keeps one long polling request open to the server and gets new data as soon as it is available.
| Request-response | Long polling | Sockets |
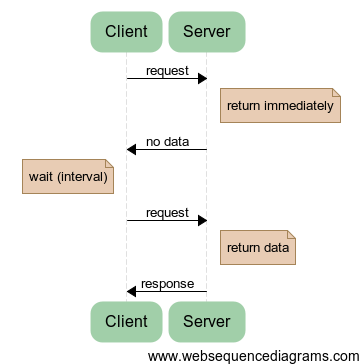 | 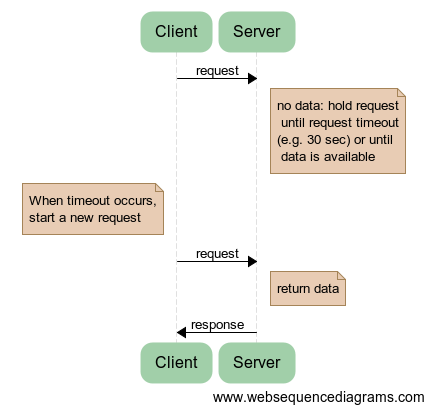 | 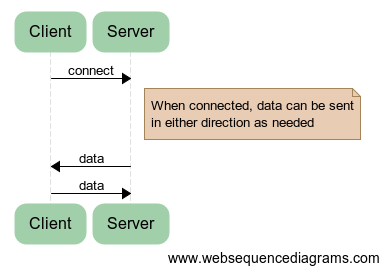 |
| The difference between request-response (simple polling), long polling and sockets | ||
To implement long polling, we need two things:
- Some sort of data payload. In our case, this will be a chat message.
- Some way of knowing which messages are new to our client. In our case, we will use a simple counter to know which messages are new.
The client will be a simple HTML page which uses jQuery to perform the long polling calls, while the server will be a Node.js server.
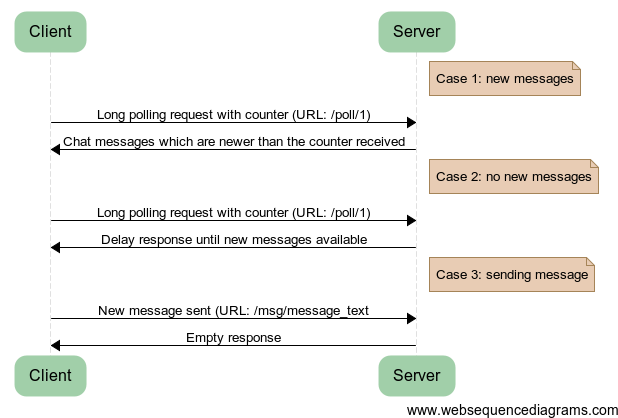
There are three cases we need to handle:
- Case 1: New messages are available when the client polls. The server should check it's message list against the counter received from the client. If the server has messages that are newer than the counter, the server should return those messages up to the current state as well as the current count.
- Case 2: No new messages are available when the client polls. The server should store the client request into the list of pending requests, and not respond until a new message arrives.
- Case 3: A client sends a new message. The server should parse the message, and add it to the message list and release all pending requests, sending the message to them.
These are illustrated below:
3.1 Building a simple server
Let’s start by getting the server to respond to HTTP requests. We will require a number of Node.js libraries:
var http = require('http'),
    url = require('url'),
    fs = require('fs');
In addition, we need storage for the messages as well as pending clients:
var messages = ["testing"];
var clients = [];
We can create a server using http.createServer(). This function takes a callback function as an argument, and calls it on each request with two parameters: the first parameter is the request, while the second parameter is the response. Refer to nodejs.org for more information on the http API. We will get into more detail in the later chapters.
Let’s create a simple server which returns “Hello World”:
http.createServer(function (req, res) {
   res.end("Hello world");
}).listen(8080, 'localhost');
console.log('Server running.');
If you run the code above using node server.js, and make a request by pointing your browser to http://localhost:8080/, you will get a page containing “Hello World”.
This is not particularly interesting, however, we have now created our first server. Let’s make the server return a file - which will contain our client code. The main reason for doing this is that browsers enforce a same-origin policy for security reasons which makes long polling complicated unless the client comes from the same URL as we will be using for the long polling.
This can be done using the FS API:
http.createServer(function (req, res) {
  fs.readFile('./index.html', function(err, data) {
    res.end(data);
  });
}).listen(8080, 'localhost');
console.log('Server running.');
We will read the file using asynchronous function fs.readFile. When it completes, it runs the inner function, which calls res.end() with the content of the file. This allows us to send back the content of the index.html file in the same directory as server.js.
3.2 Writing the client
Now that we have the capability to serve a file, let’s write our client code. The client will simply be an HTML page which includes jQuery and uses it to perform the long polling requests. We will have a simple page with a single text area, which will contain the messages we have received from the server:
<html>
<head>
<script src="http://code.jquery.com/jquery-1.6.4.min.js"></script>
<script>
// client code here
</script>
</head>
<body>
<textarea id="output" style="width: 100%; height: 100%;">
</textarea>
</body>
</html>jQuery provides a number of AJAX functions, which allow us to make HTTP requests from the browser. We will use the getJSON() function, which makes a HTTP GET call and parses the resulting data from the JSON format. The first argument is the URL to get, and the second parameter is the function which handles the returned response.
// Client code
var counter = 0;
var poll = function() {
  $.getJSON('/poll/'+counter, function(response) {
     counter = response.count;
     var elem = $('#output');
     elem.text(elem.text() + response.append);
     poll();
  });
}
poll();
We maintain a global counter, which starts at zero and is passed to in the URL to the server. The first request will be to /poll/0, with subsequent requests incrementing that counter to keep track of which messages we have already received.
Once the message is received, we update the counter on the client side, append the message text to the textarea with the ID #output, and finally initiate a new long polling request by calling poll() again. To start the polling for the first time, we call poll() at the end of code.
3.3 Implementing long-polling on the server side
Now that we have implemented the client, let’s add the code to implement long polling on the server side. Instead of responding to all requests with the contents of index.html, we need to parse the request URL and determine what we want to do.
http.createServer(function (req, res) {
   // parse URL
   var url_parts = url.parse(req.url);
   console.log(url_parts);
   if(url_parts.pathname == '/') {
      // file serving
      fs.readFile('./index.html', function(err, data) {
         res.end(data);
      });
   } else if(url_parts.pathname.substr(0, 5) == '/poll') {
     // polling code here
  }
}).listen(8080, 'localhost');
console.log('Server running.');
We are using the url API to parse the request URL, then we refer to the one of the parts of the url, the pathname which corresponds to the part that comes after the server IP/domain name. Since the client polls the “/poll” location, we check whether the first five characters of the pathname match that address before executing the poll code.
The long polling code on the server side is simple.
var count = url_parts.pathname.replace(/[^0-9]/, '');
console.log(count);
if(messages.length > count) {
  res.end(JSON.stringify( {
    count: messages.length,
    append: messages.slice(count).join("\n")+"\n"
  }));
} else {
  clients.push(res);
}
We take the URL, and remove all non-numeric characters using a regular expression. This gives us the counter value from the client: “/poll/123” becomes simply “123”. Then we check whether the messages array is longer than the counter value, and if it is, we will immediately return by using Response.end().
Because we are sending data as JSON, we create an object with the "count" and "append" properties and encode it into a string using JSON.stringify. This JSON message contains the current count on the server side (which is the same as messages.length) and all the messages starting from count (using the slice function) joined together (with newlines separating the messages).
If the count is greater than the current number of messages, then we do not do anything. The client request will remain pending, and we will store the Response object into the clients array using push(). Once this is done, our server goes back to waiting for a new message to arrive, while the client request remains open.
3.4 Implementing message receiving and broadcasting on the server side
Finally, let’s implement the message receiving functionality on the server side. Messages are received via the HTTP GET requests to the /msg/ path, for example: /msg/Hello%20World. This allows us to skip writing more client code for making these requests (easy, but unnecessary).
} else if(url_parts.pathname.substr(0, 5) == '/msg/') {
  // message receiving
  var msg = unescape(url_parts.pathname.substr(5));
  messages.push(msg);
  while(clients.length > 0) {
    var client = clients.pop();
    client.end(JSON.stringify( {
      count: messages.length,
      append: msg+"\n"
    }));
  }
  res.end();
}
We decode the url-encoded message using unescape(), then we push the message to the messages array. After this, we will notify all pending clients by continuously pop()ing the clients array until it is empty. Each pending client request receives the current message. Finally, the pending request is terminated.
3.5 Conclusion and further improvements
Try running the code in Node and sending messages using your browser:
- By navigating to http://localhost:8080/, you can open the client
- To send messages, simply open http://localhost:8080/msg/Your+message+here, replacing “Your+message+here” with the message you want to send.
If you open several client windows, they will all receive the messages you send.
There are several ways in which this simple server could be improved:
- First, the messages are not persistent - closing the server empties out the messages array. You could add persistence by writing the messages to a database when they arrive, or even more simply by using setInterval to save the messages to a file. You will then need to load the messages from the file when the server is restarted.
- Second, the client is extremely simple: it does not do anything with the messages themselves. You could implement an improved interface for displaying the messages by writing client-side Javascript that dynamically adds the new messages to a list. If you want to implement more complicated functionality, then the message format should be improved with new functionality, such as the name of the user that sent the message.
- Third, the server-side could be improved with additional functionality such as support for multiple channels and user nicknames. These are best implemented as separate classes, such as a Channel class and a User class. You will learn about implementing classes using prototypal inheritance in the chapter on Objects, and we will cover more Node.js functionality in the subsequent chapters. We will also go further with this type of application in the later section of the book, where we discuss Comet applications.
For now, this brief example should give you a basic understanding of how a long polling Node.js HTTP server can be implemented, and how you can respond to client requests. After covering some more fundamental techniques, we will cover more advanced ways of structuring your code that help you in writing more complex applications.
4. V8 and Javascript gotchas
- explain why you need a
selfvariable sometimes along with the rules surrounding thethiskeyword - explain why you might get strange results from
forloops along with the basics of the variable scope in Javascript - show a couple of other minor gotchas that I found confusing
There are basically two things that trip people up in Javascript:
- The rules surrounding the "this" keyword and
- Variable scope rules
In this chapter, I'll examine these JS gotchas and a couple of V8-related surprises. If you're feeling pretty confident, then feel free to skim or skip this chapter.
4.1 Gotcha #1: this keyword
In object-oriented programming languages, the this keyword is used to refer to the current instance of the object. For example, in Java, the value of this always refers to the current instance:
public class Counter {
  private int count = 0;
  public void increment(int value) {
    this.count += value;
  }
}
In Javascript - which is a prototype-based language - the this keyword is not fixed to a particular value. Instead, the value of this is determined by how the function is called [1]:
| Execution Context | Syntax of function call | Value of this |
| Global | n/a | global object (e.g. window) |
| Function | Method call:
myObject.foo(); |
myObject |
| Function | Baseless function call:
foo(); |
global object (e.g. window)
(undefined in strict mode) |
| Function | Using call:
foo.call(context, myArg); |
context |
| Function | Using apply:
foo.apply(context, [myArgs]); |
context |
| Function | Constructor with new:
var newFoo = new Foo(); |
the new instance
(e.g. newFoo)
|
| Evaluation | n/a | value of this in parent context |
Calling the method of an object
This is the most basic example: we have defined an object, and call object.f1():
var obj = {
  id: "An object",
  f1: function() {
    console.log(this);
  }
};
obj.f1();
As you can see, this refers to the current object, as you might expect.
Calling a standalone function
Since every function has a "this" value, you can access this even in functions that are not properties of an object:
function f1() {
  console.log(this.toString());
  console.log(this == window);
}
f1();
In this case, this refers to the global object, which is "DomWindow" in the browser and "global" in Node.
Manipulating this via Function.apply and Function.call
There are a number of built-in methods that all Functions have (see the Mozilla Developer Docs for details). Two of those built-in properties of functions allow us to change the value of "this" when calling a function:
- Function.apply(thisArg[, argsArray]): Calls the function, setting the value of
thisto thisArg and the arguments of the function the values of argsArray. - Function.call(thisArg[, arg1[, arg2[, ...]]]): Calls the function, setting the value of
thisto thisArg, and passing the arguments arg1, arg2 ... to the function.
Let's see some examples:
function f1() {
  console.log(this);
}
var obj1 = { id: "Foo"};
f1.call(obj1);
var obj2 = { id: "Bar"};
f1.apply(obj2);
As you can see, both call() and apply() allow us to specify what the value of this should be.
The difference between the two is how they pass on addional arguments:
function f1(a, b) {
  console.log(this, a, b);
}
var obj1 = { id: "Foo"};
f1.call(obj1, 'A', 'B');
var obj2 = { id: "Bar"};
f1.apply(obj2, [ 'A', 'B' ]);
Call() takes the actual arguments of call(), while apply() takes just two arguments: thisArg and an array of arguments.
Still with me? OK - now let's talk about the problems.
Context changes
As I noted earlier, the value of this is not fixed - it is determined by how the function is called. In other words, the value of this is determined at the time the function is called, rather than being fixed to some particular value.
This causes problems (pun intended) when we want to defer calling a function. For example, the following won't work:
var obj = {
  id: "xyz",
  printId: function() {
    console.log('The id is '+ this.id + ' '+ this.toString());
  }
};
setTimeout(obj.printId, 100);
Why doesn't this work? Well, for the same reason this does not work:
var obj = {
  id: "xyz",
  printId: function() {
    console.log('The id is '+ this.id + ' '+ this.toString());
  }
};
var callback = obj.printId;
callback();
Since the value of this is determined at call time - and we are not calling the function using the "object.method" notation, "this" refers to the global object -- which is not what we want.
In "setTimeout(obj.printId, 100);", we are passing the value of obj.printId, which is a function. When that function later gets called, it is called as a standalone function - not as a method of an object.
To get around this, we can create a function which maintains a reference to obj, which makes sure that this is bound correctly:
var obj = {
  id: "xyz",
  printId: function() {
    console.log('The id is '+ this.id + ' '+ this.toString());
  }
};
setTimeout(function() { obj.printId() }, 100);
var callback = function() { obj.printId() };
callback();
A pattern that you will see used frequently is to store the value of this at the beginning of a function to a variable called self, and then using self in callback in place of this:
var obj = {
  items: ["a", "b", "c"],
  process: function() {
    var self = this; // assign this to self
    this.items.forEach(function(item) {
      // here, use the original value of this!
      self.print(item);
    });
  },
  print: function(item) {
    console.log('' + item + '');
  }
};
obj.process();
Because self is an ordinary variable, it will contain the value of this when the first function was called - no matter how or when the callback function passed to forEach() gets called. If we had used "this" instead of "self" in the callback function, it would have referred to the wrong object and the call to print() would have failed.
4.2 Gotcha #2: variable scope and variable evaluation strategy
C and C-like languages have rather simple variable scope rules. Whenever you see a new block, like { ... }, you know that all the variables defined within that block are local to that block.
Javascript's scope rules differ from those of most other languages. Because of this, assigning to variables can have tricky side effects in Javascript. Look at the following snippets of code, and determine what they print out.
Don't click "run" until you've decided on what the output should be!
Example #1: A simple for loop
for(var i = 0; i < 5; i++) {
  console.log(i);
}
Example #2: a setTimeout call inside a for loop
for(var i = 0; i < 5; i++) {
 setTimeout(function() {
  console.log(i);
 }, 100);
}
Example #3: Delayed calls a function
var data = [];
for (var i = 0; i < 5; i++) {
 data[i] = function foo() {
   console.log(i);
 };
}
data0; data1; data2; data3; data4;
Example #1 should be pretty simple. It prints out “0, 1, 2, 3, 4”. However, example #2 prints out “5, 5, 5, 5, 5”. Why is this?
Looking at examples #1 to #3, you can see a pattern emerge: delayed calls, whether they are via setTimeout() or a simple array of functions all print the unexpected result “5″.
Variable scope rules in Javascript
Fundamentally, the only thing that matters is at what time the function code is executed. setTimeout() ensures that the function is only executed at some later stage. Similarly, assigning functions into an array explicitly like in example #3 means that the code within the function is only executed after the loop has been completed.
There are three things you need to remember about variable scope in Javascript:
Variable scope is based on the nesting of functions. In other words, the position of the function in the source always determines what variables can be accessed:
1.  nested functions can access their parent’s variables:

<pre class="run prettyprint">
var a = "foo"; function parent() { var b = "bar"; function nested() { console.log(a); console.log(b); } nested(); } parent();
non-nested functions can only access the topmost, global variables:
var a = "foo";
function parent() {
var b = "bar";
}
function nested() {
console.log(a);
console.log(b);
}
parent();
nested();
Defining functions creates new scopes:
1.  and the default behavior is to access previous scope:

<pre class="run prettyprint">
var a = "foo"; function grandparent() { var b = "bar"; function parent() { function nested() { console.log(a); console.log(b); } nested(); } parent(); } grandparent();
2.  but inner function scopes can prevent access to a previous scope by defining a variable with the same name:

<pre class="run prettyprint">
var a = "foo"; function grandparent() { var b = "bar"; function parent() { var b = "b redefined!"; function nested() { console.log(a); console.log(b); } nested(); } parent(); } grandparent();
- Some functions are executed later, rather than immediately. You can emulate this yourself by storing but not executing functions, see example #3.
What we would expect, based on experience in other languages, is that in the for loop, calling a the function would result in a call-by-value (since we are referencing a primitive – an integer) and that function calls would run using a copy of that value at the time when the part of the code was “passed over” (e.g. when the surrounding code was executed). That’s not what happens, because we are using a closure/nested anonymous function:
A variable referenced in a nested function/closure is not a copy of the value of the variable — it is a live reference to the variable itself and can access it at a much later stage. So while the reference to i is valid in both examples 2 and 3 they refer to the value of i at the time of their execution – which is on the next event loop – which is after the loop has run – which is why they get the value 5.
Functions can create new scopes but they do not have to. The default behavior allows us to refer back to the previous scope (all the way up to the global scope); this is why code executing at a later stage can still access i. Because no variable i exists in the current scope, the i from the parent scope is used; because the parent has already executed, the value of i is 5.
Hence, we can fix the problem by explicitly establishing a new scope every time the loop is executed; then referring back to that new inner scope later. The only way to do this is to use an (anonymous) function plus explicitly defining a variable in that scope.
We can pass the value of i from the previous scope to the anonymous nested function, but then explicitly establish a new variable j in the new scope to hold that value for future execution of nested functions:
Example #4: Closure with new scope establishing a new variable
for(var i = 0; i < 5; i++) {
  (function() {
    var j = i;
    setTimeout( function() { console.log(j); }, 500i);
  })();
}
Resulting in 0, 1, 2, 3, 4. Let's look at the expression "(function() { ... }) ()":
- ( ... ) - The first set of round brackets are simply wrappers around an expression. ( function() { ... } ) - Within that expression, we create a new anonymous function. ( function() { ... } ) () - Then we take the result of that expression, and call it as a function.
We need to have that wrapping anonymous function, because only functions establish new scope. In fact, we are establishing five new scopes when the loop is run:
- each iteration establishes it's own closure / anonymous function
- that closure / anonymous function is immediately executed
- the value of i is stored in j within the scope of that closure / anonymous function
- setTimeout() is called, which causes "function() { console.log(j); }" to run at a later point in time
- When the setTimeout is triggered, the variable j in console.log(j) refers to the j defined in closure / anonymous function
In Javascript, all functions store “a hierarchical chain of all parent variable objects, which are above the current function context; the chain is saved to the function at its creation”. Because the scope chain is stored at creation, it is static and the relative nesting of functions precisely determines variable scope. When scope resolution occurs during code execution, the value for a particular identifier such as i is searched from:
- first from the parameters given to the function (a.k.a. the activation object)
- and then from the statically stored chain of scopes (stored as the function’s internal property on creation) from top (e.g. parent) to bottom (e.g. global scope).
Javascript will keep the full set of variables of each of the statically stored chains accessible even after their execution has completed, storing them in what is called a variable object. Since code that executes later will receive the value in the variable object at that later time, variables referring to the parent scope of nested code end up having “unexpected” results unless we create a new scope when the parent is run, copy the value from the parent to a variable in that new scope and refer to the variable in the new scope.
For a much more detailed explanation, please read Dimitry Soshnikov’s detailed account of ECMA-262 which explains these things in full detail; in particular about Scope chains and Evaluation strategies.
When you are iterating through the contents of an array, you should use Array.forEach(), as it passes values as function arguments, avoiding this problem. However, in some cases you will still need to use the "create an anonymous function" technique to explicitly establish new scopes.
4.3 Other minor gotchas
You should also be aware of the following gotchas:
Object properties are not iterated in order (V8)
If you’ve done client-side scripting for Chrome, you might have run into the problems with iterating through the properties of objects. While other current Javascript engines enumerate object properties in insertion order, V8 orders properties with numeric keys in numeric order. For example:
var a = {"foo":"bar", "2":"2", "1":"1"};
for(var i in a) {
  console.log(i);
};
Produces the following output: “1 2 foo” where as in Firefox and other browsers it produces: “foo 2 1”. This means that in V8, you have to use arrays if the order of items is important to you, since the order of properties in an object will not be dependent on the order you write (or insert) them in. This is technically correct, as ECMA-262 does not specify enumeration order for objects. To ensure that items remain in the order you want them to be in, use an array:
var a = [
  { key: 'foo', val: 'bar'},
  { key: '2', val: '2' },
  { key: '1', val: '1' }
  ];
for(var i in a) {
  console.log(a[i].key)
};
Arrays items are always ordered consistently in all compliant implementations, including V8.
Comparing NaN with anything (even NaN) is always false
You cannot use the equality operators (==, ===) to determine whether a value is NaN or not. Use the built-in, global isNaN() function:
console.log(NaN == NaN);
console.log(NaN === NaN);
console.log(isNaN(NaN));
The main use case for isNaN() is checking whether a conversion from string to int/float succeeded:
console.log("Input is 123 - ", !isNaN(parseInt("123", 10)));
console.log("Input is abc - ", !isNaN(parseInt("abc", 10)));
Floating point precision
Be aware that numbers in Javascript are floating point values, and as such, are not accurate in some cases, such as:
console.log(0.1 + 0.2);
console.log(0.1 + 0.2 == 0.3);
Dealing with numbers with full precision requires specialized solutions.
5. Arrays, Objects, Functions and JSON
- Searching the content of an Array
- Checking whether the contents of an Array satisfy a criteria
- Iterating through the properties (keys) of an object
- Accepting variable number of arguments in functions
This chapter focuses on Arrays, Objects and Functions. There are a number of useful ECMAScript 5 features which are supported by V8, such as Array.forEach(), Array.indexOf(), Object.keys() and String.trim().
If you haven't heard of those functions, it's because they are part of ECMAScript 5, which is not supported by Internet Explorer versions prior to IE9.
Typically when writing Javascript for execution on the client side you have to force yourself to the lowest common denominator. The ECMAScript 5 additions make writing server side code nicer. Even IE is finally adding support for ECMA 5 - in IE9.
Arrays vs. Objects
You have the choice between using arrays or objects for storing your data in Javascript. Arrays can also be used as stacks:
var arr = [ 'a', 'b', 'c'];
arr.push('d'); // insert as last item
console.log(arr); // ['a', 'b', 'c', 'd']
console.log(arr.pop()); // remove last item
console.log(arr); // ['a', 'b', 'c']
Unshift() and shift() work on the front of the array:
var arr = [ 'a', 'b', 'c'];
arr.unshift('1'); // insert as first item
console.log(arr); // ['1','a', 'b', 'c']
console.log(arr.shift()); // remove first item
console.log(arr); // ['a', 'b', 'c']
Arrays are ordered - the order in which you add items (e.g. push/pop or shift/unshift) matters. Hence, you should use arrays for storing items which are ordered.
Objects are good for storing named values, but V8 does not allow you to specify an order for the properties (so adding properties in a particular order to an object does not guarantee that the properties will be iterated in that order). Objects can also be useful for values which need to be looked up quickly, since you can simply check for whether a property is defined without needing to iterate through the properties:
 var obj = { has_thing: true, id: 123 };
 if(obj.has_thing) {
  console.log('true', obj.id);
 }
Working with Arrays
Arrays are very versatile for storing data, and can be searched, tested, and have functions applied to them in V8 using the following ECMAScript 5 functions:
Searching the content of an Array
| Array.isArray(array) | Returns true if a variable is an array, false if it is not. |
| indexOf(searchElement[, fromIndex]) | Returns the first (least) index of an element within the array equal to the specified value, or -1 if none is found. The search can optionally begin at fromIndex. |
| lastIndexOf(searchElement[, fromIndex]) | Returns the last (greatest) index of an element within the array equal to the specified value, or -1 if none is found.The array is searched backwards, starting at fromIndex. |
The indexOf() and lastIndexOf() functions are very useful for searching an array for a particular value, if necessary. For example, to check whether a particular value is present in an array:
function process(argv) {
  if(argv.indexOf('help')) {
    console.log('This is the help text.');
  }
}
process(['foo', 'bar', 'help']);
However, be aware that indexOf() uses the strict comparison operator (===), so the following will not work:
var arr = ["1", "2", "3"];
// Search the array of keys
console.log(arr.indexOf(2)); // returns -1
This is because we defined an array of Strings, not Integers. The strict equality operator used by indexOf takes into account the type, like this:
console.log(2 == "2"); // true
console.log(2 === "2"); // false
var arr = ["1", "2", "3"];
// Search the array of keys
console.log(arr.indexOf(2)); // returns -1
console.log(arr.indexOf("2")); // returns 1
Notably, you might run into this problem when you use indexOf() on the return value of Object.keys().
var lookup = { 12: { foo: 'b'}, 13: { foo: 'a' }, 14: { foo: 'c' }};
console.log(Object.keys(lookup).indexOf(12) > -1); // false
console.log(Object.keys(lookup).indexOf(''+12) > -1); // true
Applying function to every item in an Array
| filter(callback[, thisObject]) | Creates a new array with all of the elements of this array for which the provided filtering function returns true. If a thisObject parameter is provided to filter, it will be used as the this for each invocation of the callback. IE9 |
| forEach(callback[, thisObject]) | Calls a function for each element in the array. |
| map(callback[, thisObject]) | Creates a new array with the results of calling a provided function on every element in this array. |
filter(), map() and forEach() all call a callback with every value of the array. This can be useful for performing various operations on the array. Again, the callback is invoked with three arguments: the value of the element, the index of the element, and the Array object being traversed. For example, you might apply a callback to all items in the array:
var names = ['a', 'b', 'c'];
names.forEach(function(value) {
  console.log(value);
});
// prints a b c
or you might filter based on a criterion:
var items = [ { id: 1 }, { id: 2}, { id: 3}, { id: 4 }];
// only include items with even id's
items = items.filter(function(item){
  return (item.id % 2 == 0);
});
console.log(items);
// prints [ {id: 2 }, { id: 4} ]
If you want to accumulate a particular value - like the sum of elements in an array - you can use the reduce() functions:
| reduce(callback[, initialValue]) | Apply a function simultaneously against two values of the array (from left-to-right) as to reduce it to a single value. IE9 |
| reduceRight(callback[, initialValue]) | Apply a function simultaneously against two values of the array (from right-to-left) as to reduce it to a single value. IE9 |
reduce() and reduceRight() apply a function against an accumulator and each value of the array. The callback receives four arguments: the initial value (or value from the previous callback call), the value of the current element, the current index, and the array over which iteration is occurring (e.g. arr.reduce(function(previousValue, currentValue, index, array){ ... }).
Checking whether the contents of an Array satisfy a criteria
| every(callback[, thisObject]) | Returns true if every element in this array satisfies the provided testing function. |
| some(callback[, thisObject]) | Returns true if at least one element in this array satisfies the provided testing function. |
some() and every() allow for a condition to be specified which is then tested against all the values in the array. The callback is invoked with three arguments: the value of the element, the index of the element, and the Array object being traversed. For example, to check whether a particular string contains at least one of the tokens in an array, use some():
var types = ['text/html', 'text/css', 'text/javascript'];
var string = 'text/javascript; encoding=utf-8';
if (types.some(function(value) {
    return string.indexOf(value) > -1;
  })) {
  console.log('The string contains one of the content types.');
}
ECMA 3 Array functions
I'd just like to remind you that these exist:
| sort([compareFunction]) | Sorts the elements of an array. |
| concat(value1, value2, ..., valueN) | Returns a new array comprised of this array joined with other array(s) and/or value(s). |
| join(separator) | Joins all elements of an array into a string. |
| slice(begin[, end] | Extracts a section of an array and returns a new array. |
| splice(index [,howMany][,element1[, ...[, elementN]]] | Adds and/or removes elements from an array. |
| reverse | Reverses the order of the elements of an array -- the first becomes the last, and the last becomes the first. |
These functions are part of ECMAScript 3, so they are available on all modern browsers.
var a = [ 'a', 'b', 'c' ];
var b = [ 1, 2, 3 ];
console.log( a.concat(['d', 'e', 'f'], b) );
console.log( a.join('! ') );
console.log( a.slice(1, 3) );
console.log( a.reverse() );
console.log( ' --- ');
var c = a.splice(0, 2);
console.log( a, c );
var d = b.splice(1, 1, 'foo', 'bar');
console.log( b, d );
Working with Objects
Objects are useful when you need to have named properties (like a hash), and you don't care about the order of the properties. The most common basic operations include iterating the properties and values of an Object, and working with arrays of Objects.
Object.keys(obj) |
Returns a list of the ownProperties of an object that are enumerable. |
hasOwnProperty(prop) |
Returns a boolean indicating whether the object has the specified property. This method can be used to determine whether an object has the specified property as a direct property of that object; unlike the in operator, this method does not check down the object's prototype chain. |
prop in objectName | The in operator returns true if the specified property is in the specified object. It is useful for checking for properties which have been set to undefined, as it will return true for those as well. |
You can use this to count the number of properties in an object which you are using as a hash table:
// returns array of keys
var keys = Object.keys({ a: 'foo', b: 'bar'});
// keys.length is 2
console.log(keys, keys.length);
Iterating through the properties (keys) of an object
An easy way to iterate through the keys is to use Object.keys() and then apply Array.forEach() on the array:
var group = { 'Alice': { a: 'b', b: 'c' }, 'Bob': { a: 'd' }};
var people = Object.keys(group);
people.forEach(function(person) {
  var items = Object.keys(group[person]);
  items.forEach(function(item) {
    var value = group[person][item];
    console.log(person+': '+item+' = '+value);
  });
});
Iterating objects in alphabetical order
Remember that object properties are not necessarily retrieved in order, so if you want the keys to be in alphabetical order, use sort():
var obj = { x: '1', a: '2', b: '3'};
var items = Object.keys(obj);
items.sort(); // sort the array of keys
items.forEach(function(item) {
  console.log(item + '=' + obj[item]);
});
Sorting arrays of objects by property
The default sort function compares the items in the array as strings, but you can pass a custom function to sort() if you want to sort an array of objects by a property of the objects:
var arr = [
  { item: 'Xylophone' },
  { item: 'Carrot' },
  { item: 'Apple'}
  ];
arr = arr.sort(function (a, b) {
  return a.item.localeCompare(b.item);
});
console.log( arr );
The code above uses the comparator parameter of sort() to specify a custom sort, and then uses String.localCompare to return the correct sort order information.
Checking whether a property is present, even if it is false
There are multiple ways of checking whether a property is defined:
var obj = { a: "value", b: false };
// nonexistent properties
console.log( !!obj.nonexistent );
console.log( 'nonexistent' in obj );
console.log( obj.hasOwnProperty('nonexistent') );

// existing properties
console.log( !!obj.a );
console.log( 'a' in obj );
console.log( obj.hasOwnProperty('a') );
The expression !!obj.propertyname takes the value of the property (or undefined) and converts it to a Boolean by negating it twice (!true == false, !!true == true).
The in keyword searches for the property in the object, and will return true even if the value of the property is zero, false or an empty string.
var obj = { a: "value", b: false };
// different results when the value evaluates to false
console.log( !!obj.b );
console.log( 'b' in obj );
console.log( obj.hasOwnProperty('b') );
The hasOwnProperty() method does not check down the object's prototype chain, which may be desirable in some cases:
var obj = { a: "value", b: false };
// different results when the property is from an object higher up in the prototype chain
console.log( !!obj.toString );
console.log( 'toString' in obj );
console.log( obj.hasOwnProperty('toString') );
(Note: All objects have a toString method, derived from Object).
Filtering an array of objects
function match(item, filter) {
  var keys = Object.keys(filter);
  // true if any true
  return keys.some(function (key) {
    return item[key] == filter[key];
  });
}
var objects = [ { a: 'a', b: 'b', c: 'c'},
  { b: '2', c: '1'},
  { d: '3', e: '4'},
  { e: 'f', c: 'c'} ];

objects.forEach(function(obj) {
  console.log('Result: ', match(obj, { c: 'c', d: '3'}));
});
Substituting some() with every() above would change the definition of match() so that all key-value pairs in the filter object must match.
Working with Functions
Defining new functions:
function doSomething() { return 'doSomething'; }
var doSomethingElse = function() { return 'doSomethingElse'; };
console.log( doSomething() );
console.log( doSomethingElse() );
Order of function definition within a scope does not matter, but when defining a function as a variable the order does matter.
console.log( doSomething() );
console.log( doSomethingElse() );
// define the functions after calling them!
var doSomethingElse = function() { return 'doSomethingElse'; };
function doSomething() { return 'doSomething'; }
Functions are objects, so they can have properties attached to them.
function doSomething() { return doSomething.value + 50; }
var doSomethingElse = function() { return doSomethingElse.value + 100; };
doSomething.value = 100;
doSomethingElse.value = 100;
console.log( doSomething() );
console.log( doSomethingElse() );
Call and apply
The value of the this keyword is determined by how the function was called. For the details, see the section on this scope and call() and apply() in the previous chapter.
| Function.call | Calls a function with a given this value and arguments provided individually. |
| Function.apply | Applies the method of another object in the context of a different object (the calling object); arguments can be passed as an Array object. |
As you can see, both call() and apply() allow us to specify what the value of this should be.
The difference between the two is how they pass on addional arguments:
function f1(a, b) {
  console.log(this, a, b);
}
var obj1 = { id: "Foo"};
f1.call(obj1, 'A', 'B'); // The value of this is changed to obj1
var obj2 = { id: "Bar"};
f1.apply(obj2, [ 'A', 'B' ]); // The value of this is changed to obj2
The syntax of call() is identical to that of apply(). The difference is that call() uses the actual arguments passed to it (after the first argument), while apply() takes just two arguments: thisArg and an array of arguments.
Variable number of arguments
Functions have a arguments property:
| Property: arguments | The arguments property contains all the parameters passed to the function |
which contains all the arguments passed to the function:
var doSomethingElse = function(a, b) {
  console.log(a, b);
  console.log(arguments);
};
doSomethingElse(1, 2, 3, 'foo');
Using apply() and arguments:
function smallest(){
  return Math.min.apply( Math, arguments);
}
console.log( smallest(999, 899, 99999) );
The arguments variable available in functions is not an Array, through it acts mostly like an array. For example, it does not have the push() and pop() methods but it does have a length property:
function test() {
  console.log(arguments.length);
  console.log(arguments.concat(['a', 'b', 'c'])); // causes an error
}
test(1, 2, 3);
To create an array from the arguments property, you can use Array.prototype combined with Function.call:
function test() {
  // Create a new array from the contents of arguments
  var args = Array.prototype.slice.call(arguments); // returns an array
  console.log(args.length);
  console.log(args.concat(['a', 'b', 'c'])); // works
}
test(1, 2, 3);
Working with JSON data
The JSON functions are particularly useful for working with data structures in Javascript. They can be used to transform objects and arrays to strings.
| JSON.parse(text[, reviver]); | Parse a string as JSON, optionally transform the produced value and its properties, and return the value. |
| JSON.stringify(value[, replacer [, space]]); | Return a JSON string corresponding to the specified value, optionally including only certain properties or replacing property values in a user-defined manner. |
JSON.parse() can be used to convert JSON data to a Javascript Object or Array:
// returns an Object with two properties
var obj = JSON.parse('{"hello": "world", "data": [ 1, 2, 3 ] }');
console.log(obj.data);
JSON.stringify() does the opposite:
var obj = { hello: 'world', data: [ 1, 2, 3 ] };
console.log(JSON.stringify(obj));
The optional space parameter in JSON.stringify is particularly useful in producing readable output from complex object.
The reviver and replacer parameters are rarely used. They expect a function which takes the key and value of each value as an argument. That function is applied to the JSON input before returning it.
6. Objects and classes by example
- cover OOP in Javascript by example
- point out a few caveats and recommended solutions
I'm not covering the theory behind this, but I recommend that you start by learning more about the prototype chain, because understanding the prototype chain is essential to working effectively with JS.
The concise explanation is:
- Javascript is an object-oriented programming language that supports delegating inheritance based on prototypes.
- Each object has a prototype property, which refers to another (regular) object.
- Properties of an object are looked up from two places:
- the object itself (Obj.foo), and
- if the property does not exist, on the prototype of the object (Obj.prototype.foo).
- Since this lookup is performed recursively (e.g. Obj.foo, Obj.prototype.foo, Obj.prototype.prototype.foo), each object can be said to have a prototype chain.
- Assigning to an undefined property of an object will create that property on the object. Properties of the object itself take precedence over properties of prototypes.
- New objects are created using a constructor, which is a regular function invoked using
new - The
newconstructor call (e.g.new Foo()):- creates a new object,
- sets the prototype of that object to Foo.prototype and
- passes that as
thisto the constructor.
- The delegating inheritance implemented in Javascript is different from "classical" inheritance: it is based on run time lookups from the prototype property rather than statically defined class constructs. The prototype chain lookup mechanism is the essence of prototypal inheritance.
There are further nuances to the system. Here are my recommendations on what to read:
- ECMA-262-3 in detail. Chapter 7.1. OOP: The general theory from Dmitry Soshnikov
- ECMA-262-3 in detail. Chapter 7.2. OOP: ECMAScript implementation from Dmitry Soshnikov
- Details of the Object Model from Mozilla
Let's look at some applied patterns next:
Class pattern
// Constructor
function Foo(bar) {
  // always initialize all instance properties
  this.bar = bar;
  this.baz = 'baz'; // default value
}
// class methods
Foo.prototype.fooBar = function() {

};
// export the class
module.exports = Foo;
Instantiating a class is simple:
// constructor call
var object = new Foo('Hello');
Note that I recommend using function Foo() { ... } for constructors instead of var Foo = function() { ... }.
The main benefit is that you get better stack traces from Node when you use a named function. Generating a stack trace from an object with an unnamed constructor function:
var Foo = function() { };
Foo.prototype.bar = function() { console.trace(); };

var f = new Foo();
f.bar();
... produces something like this:
Trace:
    at [object Object].bar (/home/m/mnt/book/code/06_oop/constructors.js:3:11)
    at Object.<anonymous> (/home/m/mnt/book/code/06_oop/constructors.js:7:3)
    at Module._compile (module.js:432:26)
    at Object..js (module.js:450:10)
    at Module.load (module.js:351:31)
    at Function._load (module.js:310:12)
    at Array.0 (module.js:470:10)
    at EventEmitter._tickCallback (node.js:192:40)
... while using a named function
function Baz() { };
Baz.prototype.bar = function() { console.trace(); };

var b = new Baz();
b.bar();
... produces a stack trace with the name of the class:
Trace:
    at Baz.bar (/home/m/mnt/book/code/06_oop/constructors.js:11:11)
    at Object.<anonymous> (/home/m/mnt/book/code/06_oop/constructors.js:15:3)
    at Module._compile (module.js:432:26)
    at Object..js (module.js:450:10)
    at Module.load (module.js:351:31)
    at Function._load (module.js:310:12)
    at Array.0 (module.js:470:10)
    at EventEmitter._tickCallback (node.js:192:40)
To add private shared (among all instances of the class) variables, add them to the top level of the module:
// Private variable
var total = 0;

// Constructor
function Foo() {
  // access private shared variable
  total++;
};
// Expose a getter (could also expose a setter to make it a public variable)
Foo.prototype.getTotalObjects = function(){
  return total;
};
Avoid assigning variables to prototypes
If you want to define a default value for a property of an instance, define it in the constructor function.
Prototypes should not have properties that are not functions, because prototype properties that are not primitives (such as arrays and objects) will not behave as one would expect, since they will use the instance that is looked up from the prototype. Example for Dimitry Sosnikov's site:
var Foo = function (name) { this.name = name; };
Foo.prototype.data = [1, 2, 3]; // setting a non-primitive property
Foo.prototype.showData = function () { console.log(this.name, this.data); };

var foo1 = new Foo("foo1");
var foo2 = new Foo("foo2");

// both instances use the same default value of data
foo1.showData(); // "foo1", [1, 2, 3]
foo2.showData(); // "foo2", [1, 2, 3]

// however, if we change the data from one instance
foo1.data.push(4);

// it mirrors on the second instance
foo1.showData(); // "foo1", [1, 2, 3, 4]
foo2.showData(); // "foo2", [1, 2, 3, 4]
Hence prototypes should only define methods, not data.
If you set the variable in the constructor, then you will get the behavior you expect:
function Foo(name) {
  this.name = name;
  this.data = [1, 2, 3]; // setting a non-primitive property
};
Foo.prototype.showData = function () { console.log(this.name, this.data); };
var foo1 = new Foo("foo1");
var foo2 = new Foo("foo2");
foo1.data.push(4);
foo1.showData(); // "foo1", [1, 2, 3, 4]
foo2.showData(); // "foo2", [1, 2, 3]
Don't construct by returning objects - use prototype and new
For example, construction pattern which returns an object is terrible (even though it was introduced in "JavaScript: The Good Parts"):
function Phone(phoneNumber) {
  var that = {};
  // You are constructing a custom object on every call!
  that.getPhoneNumber = function() {
    return phoneNumber;
  };
  return that;
};
// or
function Phone() {
  // You are constructing a custom object on every call!
  return {
    getPhoneNumber: function() { ... }
  };
};
Here, every time we run Phone(), a new object is created with a new property. The V8 runtime cannot optimize this case, since there is no indication that instances of Phone are a class; they look like custom objects to the engine since prototypes are not used. This leads to slower performance.
It's also broken in another way: you cannot change the prototype properties of all instances of Phone, since they do not have a common ancestor/prototype object. Prototypes exists for a reason, so use the class pattern described earlier.
Avoid implementing classical inheritance
I think classical inheritance is in most cases an antipattern in Javascript. Why?
There are two reasons to have inheritance:
- to support polymorphism in languages that do not have dynamic typing, like C++. The class acts as an interface specification for a type. This provides the benefit of being able to replace one class with another (such as a function that operates on a Shape that can accept subclasses like Circle). However, Javascript doesn't require you to do this: the only thing that matters is that a method or property can be looked up when called/accessed.
- to reuse code. Here the theory is that you can reuse code by having a hierarchy of items that go from an abstract implementation to a more specific one, and you can thus define multiple subclasses in terms of a parent class. This is sometimes useful, but not that often.
The disadvantages of inheritance are:
- Nonstandard, hidden implementations of classical inheritance. Javascript doesn't have a builtin way to define class inheritance, so people invent their own ones. These implementations are similar to each other, but differ in subtle ways.
- Deep inheritance trees. Subclasses are aware of the implementation details of their superclasses, which means that you need to understand both. What you see in the code is not what you get: instead, parts of an implementation are defined in the subclass and the rest are defined piecemeal in the inheritance tree. The implementation is thus sprinkled over multiple files, and you have to mentally recombine those to understand the actual behavior.
I favor composition over inheritance:
- Composition - Functionality of an object is made up of an aggregate of different classes by containing instances of other objects.
- Inheritance - Functionality of an object is made up of it's own functionality plus functionality from its parent classes.
If you must have inheritance, use plain old JS
If you must implement inheritance, at least avoid using yet another nonstandard implementation / magic function. Here is how you can implement a reasonable facsimile of inheritance in pure ES3 (as long as you follow the rule of never defining properties on prototypes):
function Animal(name) {
  this.name = name;
};
Animal.prototype.move = function(meters) {
  console.log(this.name+" moved "+meters+"m.");
};

function Snake() {
  Animal.apply(this, Array.prototype.slice.call(arguments));
};
Snake.prototype = new Animal();
Snake.prototype.move = function() {
  console.log("Slithering...");
  Animal.prototype.move.call(this, 5);
};

var sam = new Snake("Sammy the Python");
sam.move();
This is not the same thing as classical inheritance - but it is standard, understandable Javascript and has the functionality that people mostly seek: chainable constructors and the ability to call methods of the superclass.
Or use util.inherits() (from the Node.js core). Here is the full implementation:
var inherits = function (ctor, superCtor) {
    ctor.super_ = superCtor;
    ctor.prototype = Object.create(superCtor.prototype, {
        constructor: {
            value: ctor,
            enumerable: false
        }
    });
};
And a usage example:
var util = require('util');
function Foo() { }
util.inherits(Foo, EventEmitter);
The only real benefit to util.inherits is that you don't need to use the actual ancestor name in the Child constructor.
Note that if you define variables as properties of a prototype, you will experience unexpected behavior (e.g. since variables defined on the prototype of the superclass will be accessible in subclasses but will also be shared among all instances of the subclass).
As I pointed out with the class pattern, always define all instance variables in the constructor. This forces the properties to exist on the object itself and avoids lookups on the prototype chain for these variables.
Otherwise, you might accidentally define/access a variable property defined in a prototype. Since the prototype is shared among all instances, this will lead to the unexpected behavior if the variable is not a primitive (e.g. is an Object or an Array). See the earlier example under "Avoid setting variables as properties of prototypes".
Use mixins
A mixin is a function that adds new functions to the prototype of an object. I prefer to expose an explicit mixin() function to indicate that the class is designed to be mixed into another one:
function Foo() { }
Foo.prototype.bar = function() { };
Foo.prototype.baz = function() { };

// mixin - augment the target object with the Foo functions
Foo.mixin = function(destObject){
  ['bar', 'baz'].forEach(function(property) {
    destObject.prototype[property] = Foo.prototype[property];
  });
};

module.exports = Foo;
Extending the Bar prototype with Foo:
var Foo = require('./foo.js');
function Bar() {}
Bar.prototype.qwerty = function() {};

// mixin Foo
Foo.mixin(Bar);
Avoid currying
Currying is a shorthand notation for creating an anonymous function with a new scope that calls another function. In other words, anything you can do using currying can be done using a simple anonymous function and a few variables local to that function.
Function.prototype.curry = function() {
  var fn = this;
  var args = Array.prototype.slice.call(arguments);
  return function() {
    return fn.apply(this, args.concat(Array.prototype.slice.call(arguments, 0)));
  };
}
Currying is intriguing, but I haven't seen a practical use case for it outside of subverting how the this argument works in Javascript.
Don't use currying to change the context of a call/thethis argument. Use the "self" variable accessed through an anonymous function, since it achieves the same thing but is more obvious.
Instead of using currying:
function foo(a, b, c) { console.log(a, b, c); }

var bar = foo.curry('Hello');
bar('World', '!');
I think that writing:
function foo(a, b, c) { console.log(a, b, c); }

function bar(b, c) { foo('Hello', b, c); }
bar('World', '!');
is more clear.
7. Control flow
- discuss nested callbacks and control flow in Node
- introduce three essential async control flow patterns:
- Series - for running async tasks one at a time
- Fully parallel - for running async tasks all at the same time
- Limitedly parallel - for running a limited number of async tasks at the same time
- walk you through a simple implementation of these control flow patterns
- and convert the simple implementation into a control flow library that takes callback arguments
When you start coding with Node.js, it’s a bit like learning programming the first time. Since you want everything to be asynchronous, you use a lot of callbacks without really thinking about how you should structure your code. It’s a bit like being overexcited about the if statement, and using it and only it to write complex programs. One of my first programs in primary school was a text-based adventure where you would be presented with a scenario and a choice. I wrote code until I reached the maximum level of nesting supported by the compiler, which probably was 63 nested if statements.
Learning how to code with callbacks is similar in many ways. If that is the only tool you use, you will create a mess.
Enlightenment comes when you realize that this:
async1(function(input, result1) {
  async2(function(result2) {
    async3(function(result3) {
      async4(function(result4) {
        async5(function(output) {
            // do something with output
        });
      });
    });
  });
})
ought be written as:
myLibrary.doStuff(input, function(output){
  // do something with output
});
In other words, you can and are supposed to think in terms of higher level abstractions. Refactor, and extract functionality into it’s own module. There can be any number of callbacks between the input that matters and the output that matters, just make sure that you split the functionality into meaningful modules rather than dumping it all into one long chain.
Yes, there will still be some nested callbacks. However, more than a couple of levels of nesting would should be a code smell - time to think what you can abstract out into separate, small modules. This has the added benefit of making testing easier, because you end up having smaller, hopefully meaningful code modules that provide a single capability.
Unlike in tradional scripting languages based on blocking I/O, managing the control flow of applications with callbacks can warrant specialized modules which coordinate particular work flows: for example, by dealing with the level concurrency of execution.
Blocking on I/O provides just one way to perform I/O tasks: sequentially (well, at least without threads). With Node's "everything can be done asynchronously" approach, we get more options and can choose when to block, when to limit concurrency and when to just launch a bunch of tasks at the same time.
Let's look at the most common control flow patterns, and see how we can take something as abstract as control flow and turn it into a small, single purpose module to take advantage of callbacks-as-input.
7.2 Control flow: Specifying execution order
If you’ve started reading some of the tutorials online, you’ll find a bewildering number of different control-flow libraries for Node. I find it quite confusing that each of these has it’s own API and terminology - talking about promises, steps, vows, futures and so on. Rather than endorse any particular control flow solution, let’s drill down to the basics, look at some fundamental patterns and try to come up with a simple and undramatic set of terms to describe the different options we have for control flow in Node.
As you already know, there are two types of API functions in Node.js:
- asynchronous, non-blocking functions - for example: fs.readFile(filename, [encoding], [callback])
- synchronous, blocking functions - for example: fs.readFileSync(filename, [encoding])
Synchronous functions return a result:
var data = fs.readFileSync('/etc/passwd');While asynchronous functions receive the result via a callback (after passing control to the event loop):
fs.readFileSync('/etc/passwd', function(err, data) { … } );Writing synchronous code is not problematic: we can draw on our experience in other languages to structure it appropriately using keywords like if, else, for, while and switch. It’s the way we should structure asynchronous calls which is most problematic, because established practices do not help here. For example, we’d like to read a thousand text files. Take the following naive code:
for(var i = 1; i <= 1000; i++) {
  fs.readFile('./'+i+'.txt', function() {
     // do something with the file
  });
}
do_next_part();
This code would start 1000 simultaneous asynchronous file reads, and run the do_next_part() function immediately. This has several problems: first, we’d like to wait until all the file reads are done until going further. Second, launching a thousand file reads simultaneously will quickly exhaust the number of available file handles (a limited resource needed to read files). Third, we do not have a way to accumulate the result for do_next_part().
We need:
- a way to control the order in which the file reads are done
- some way to collect the result data for processing
- some way to restrict the concurrency of the file read operations to conserve limited system resources
- a way to determine when all the reads necessary for the do_next_part() are completed
Control flow functions enable us to do this in Node.js. A control flow function is a lightweight, generic piece of code which runs in between several asynchronous function calls and which take care of the necessary housekeeping to:
- control the order of execution,
- collect data,
- limit concurrency and
- call the next step in the program.
There are three basic patterns for this.
7.2.1 Control flow pattern #1: Series - an asynchronous for loop
Sometimes we just want to do one thing at a time. For example, we need to do five database queries, and each of those queries needs data from the previous query, so we have to run one after another.
A series does that:
// Async task (same in all examples in this chapter)
function async(arg, callback) {
  console.log('do something with \''+arg+'\', return 1 sec later');
  setTimeout(function() { callback(arg  2); }, 1000);
}
// Final task (same in all the examples)
function final() { console.log('Done', results); }

// A simple async series:
var items = [ 1, 2, 3, 4, 5, 6 ];
var results = [];
function series(item) {
  if(item) {
    async( item, function(result) {
      results.push(result);
      return series(items.shift());
    });
  } else {
    return final();
  }
}
series(items.shift());
Basically, we take a set of items and call the series control flow function with the first item. The series launches one async() operation, and passes a callback to it. The callback pushes the result into the results array and then calls series with the next item in the items array. When the items array is empty, we call the final() function.
This results in serial execution of the asynchronous function calls. Control is passed back to the Node event loop after each async I/O operation is completed, then returned back when the operation is completed.
Characteristics:
- Runs a number of operations sequentially
- Only starts one async operation at a time (no concurrency)
- Ensures that the async function complete in order
Variations:
- The way in which the result is collected (manual or via a “stashing” callback)
- How error handling is done (manually in each subfunction, or via a dedicated, additional function)
- Since execution is sequential, there is no need for a “final” callback
Tags: sequential, no-concurrency, no-concurrency-control
7.2.2 Control flow pattern #2: Full parallel - an asynchronous, parallel for loop
In other cases, we just want to take a small set of operations, launch them all in parallel and then do something when all of them are complete.
A fully parallel control flow does that:
function async(arg, callback) {
  console.log('do something with \''+arg+'\', return 1 sec later');
  setTimeout(function() { callback(arg  2); }, 1000);
}
function final() { console.log('Done', results); }

var items = [ 1, 2, 3, 4, 5, 6 ];
var results = [];

items.forEach(function(item) {
  async(item, function(result){
    results.push(result);
    if(results.length == items.length) {
      final();
    }
  })
});
We take every item in the items array and start async operations for each of the items immediately. The async() function is passed a function that stores the result and then checks whether the number of results is equal to the number of items to process. If it is, then we call the final() function.
Since this means that all the I/O operations are started in parallel immediately, we need to be careful not to exhaust the available resources. For example, you probably don't want to start 1000's of I/O operations, since there are operating system limitations for the number of open file handles. You need to consider whether launching parallel tasks is OK on a case-by-case basis.
Characteristics:
- Runs a number of operations in parallel
- Starts all async operations in parallel (full concurrency)
- No guarantee of order, only that all the operations have been completed
Variations:
- The way in which the result is collected (manual or via a “stashing” callback)
- How error handling is done (via the first argument of the final function, manually in each subfunction, or via a dedicated, additional function)
- Whether a final callback can be specified
Tags: parallel, full-concurrency, no-concurrency-control
7.2.3 Control flow pattern #3: Limited parallel - an asynchronous, parallel, concurrency limited for loop
In this case, we want to perform some operations in parallel, but keep the number of running I/O operations under a set limit:
function async(arg, callback) {
  console.log('do something with \''+arg+'\', return 1 sec later');
  setTimeout(function() { callback(arg  2); }, 1000);
}
function final() { console.log('Done', results); }

var items = [ 1, 2, 3, 4, 5, 6 ];
var results = [];
var running = 0;
var limit = 2;

function launcher() {
  while(running < limit && items.length > 0) {
    var item = items.shift();
    async(item, function(result) {
      results.push(result);
      running--;
      if(items.length > 0) {
        launcher();
      } else if(running == 0) {
        final();
      }
    });
    running++;
  }
}

launcher();
We start new async() operations until we reach the limit (2). Each async() operation gets a callback which stores the result, decrements the number of running operations, and then check whether there are items left to process. If yes, then laucher() is run again. If there are no items to process and the current operation was the last running operation, then final() is called.
Of course, the criteria for whether or not we should launch another task could be based on some other logic. For example, we might keep a pool of database connections, and check whether "spare" connections are available - or check server load - or make the decision based on some more complicated criteria.
Characteristics:
- Runs a number of operations in parallel
- Starts a limited number of operations in parallel (partial concurrency, full concurrency control)
- No guarantee of order, only that all the operations have been completed
7.3 Building a control flow library on top of these patterns
For the sake of simplicity, I used a fixed array and named functions in the control flow patterns above.
The problem with the examples above is that the control flow is intertwined with the data structures of our specific use case: taking items from an array and populating another array with the results from a single function.
We can write the same control flows as functions that take arguments in the form:
series([
  function(next) { async(1, next); },
  function(next) { async(2, next); },
  function(next) { async(3, next); },
  function(next) { async(4, next); },
  function(next) { async(5, next); },
  function(next) { async(6, next); }
], final);
E.g. an array of callback functions and a final() function.
The callback functions get a next() function as their first parameter which they should call when they have completed their async operations. This allows us to use any async function as part of the control flow.
The final function is called with a single parameter: an array of arrays with the results from each async call. Each element in the array corresponds the values passed back from the async function to next(). Unlike the examples in previous section, these functions store all the results from the callback, not just the first argument - so you can call next(1, 2, 3, 4) and all the arguments are stored in the results array.
Series
This conversion is pretty straightforward. We pass an anonymous function which pushes to results and calls next() again: this is so that we can push the results passed from the callback via arguments immediately, rather than passing them directly to next() and handling them in next().
function series(callbacks, last) {
  var results = [];
  function next() {
    var callback = callbacks.shift();
    if(callback) {
      callback(function() {
        results.push(Array.prototype.slice.call(arguments));
        next();
      });
    } else {
      last(results);
    }
  }
  next();
}
// Example task
function async(arg, callback) {
  var delay = Math.floor(Math.random()  5 + 1)  100; // random ms
  console.log('async with \''+arg+'\', return in '+delay+' ms');
  setTimeout(function() { callback(arg  2); }, delay);
}
function final(results) { console.log('Done', results); }

series([
  function(next) { async(1, next); },
  function(next) { async(2, next); },
  function(next) { async(3, next); },
  function(next) { async(4, next); },
  function(next) { async(5, next); },
  function(next) { async(6, next); }
], final);
Full parallel
Unlike in a series, we cannot assume that the results are returned in any particular order.
Because of this we use callbacks.forEach, which returns the index of the callback - and store the result to the same index in the results array.
Since the last callback could complete and return it's result first, we cannot use results.length, since the length of an array always returns the largest index in the array + 1. So we use an explicit result_counter to track how many results we've gotten back.
function fullParallel(callbacks, last) {
  var results = [];
  var result_count = 0;
  callbacks.forEach(function(callback, index) {
    callback( function() {
      results[index] = Array.prototype.slice.call(arguments);
      result_count++;
      if(result_count == callbacks.length) {
        last(results);
      }
    });
  });
}
// Example task
function async(arg, callback) {
  var delay = Math.floor(Math.random()  5 + 1)  100; // random ms
  console.log('async with \''+arg+'\', return in '+delay+' ms');
  setTimeout(function() { callback(arg  2); }, delay);
}
function final(results) { console.log('Done', results); }

fullParallel([
  function(next) { async(1, next); },
  function(next) { async(2, next); },
  function(next) { async(3, next); },
  function(next) { async(4, next); },
  function(next) { async(5, next); },
  function(next) { async(6, next); }
], final);
Limited parallel
This is a bit more complicated, because we need to launch async tasks once other tasks finish, and need to store the result from those tasks back into the correct position in the results array. Details further below.
function limited(limit, callbacks, last) {
  var results = [];
  var running = 1;
  var task = 0;
  function next(){
    running--;
    if(task == callbacks.length && running == 0) {
      last(results);
    }
    while(running < limit && callbacks[task]) {
      var callback = callbacks[task];
      (function(index) {
        callback(function() {
          results[index] = Array.prototype.slice.call(arguments);
          next();
        });
      })(task);
      task++;
      running++;
    }
  }
  next();
}
// Example task
function async(arg, callback) {
  var delay = Math.floor(Math.random()  5 + 1)  1000; // random ms
  console.log('async with \''+arg+'\', return in '+delay+' ms');
  setTimeout(function() {
    var result = arg  2;
    console.log('Return with \''+arg+'\', result '+result);
    callback(result);
  }, delay);
}
function final(results) { console.log('Done', results); }

limited(3, [
  function(next) { async(1, next); },
  function(next) { async(2, next); },
  function(next) { async(3, next); },
  function(next) { async(4, next); },
  function(next) { async(5, next); },
  function(next) { async(6, next); }
], final);
We need to keep two counter values here: one for the next task, and another for the callback function.
In the fully parallel control flow we took advantage of [].forEach(), which returns the index of the currently running task in it's own scope.
Since we cannot rely on forEach() as tasks are launched in small groups, we need to use an anonymous function to get a new scope to hold the original index. This index is used to store the return value from the callback.
To illustrate the problem, I added a longer delay to the return from async() and an additional line of logging which shows when the result from async is returned. At that moment, we need to store the return value to the right index.
The anonymous function: (function(index) { ... } (task)) is needed because if we didn't create a new scope using an anonymous function, we would store the result in the wrong place in the results array (since the value of task might have changed between calling the callback and returning back from the callback). See the chapter on Javascript gotchas for more information on scope rules in JS.
7.4 The fourth control flow pattern
There is a fourth control flow pattern, which I won't discuss here: eventual completion. In this case, we are not interested in strictly controlling the order of operations, only that they occur at some point and are correctly responded to.
In Node, this can be implemented using EventEmitters. These are discussed in the chapter on Node fundamentals.
8. An overview of Node: Modules and npm
- discuss modules and process-related globals in Node
Node.js has a good amount of functionality built in. Let's look at the Table of Contents for the API documentation and try to group it into manageable chunks (italic = not covered here):
| Fundamentals Globals STDIO Timers Modules Events Buffers Streams C/C++ Addons | Network I/O HTTP HTTPS URL Query Strings Net UDP/Datagram DNS | File system I/O File System Path Process I/O and V8 VM Process VM Child Processes Cluster |
| Terminal/console REPL Readline TTY | Testing & debugging Assertion Testing Debugger Utilities | Misc Crypto TLS/SSL _String Decoder ZLIB OS_ |
I’ll go through the parts of the Node API that you’ll use the most when writing web applications. The rest of the API is best looked up from nodejs.org/api/.
| Fundamentals The current chapter and Chapter 9. | Network I/O HTTP and HTTPS are covered in Chapter 10. | File system I/O The file system module is covered in Chapter 11. |
| Process I/O and V8 VM Covered in Chapter TODO. | Terminal/console REPL is discussed in Chapter TODO. | Testing and debugging Coverage TODO. |
8.1 Node.js modules
Let's talk about the module system in Node.
Modules make it possible to include other Javascript files into your applications. In fact, a vast majority of Node’s core functionality is implemented using modules written in Javascript - which means you can read the source code for the core libraries on Github.
Modules are crucial to building applications in Node, as they allow you to include external libraries, such as database access libraries - and they help in organizing your code into separate parts with limited responsibilities. You should try to identify reusable parts in your own code and turn them into separate modules to reduce the amount of code per file and to make it easier to read and maintain your code.
Using modules is simple: you use the require() function, which takes one argument: the name of a core library or a file system path to the module you want to load. You’ve seen this before in the simple messaging application example, where I used require() to use several core modules.
To make a module yourself, you need to specify what objects you want to export. The exports object is available in the top level scope in Node for this purpose:
exports.funcname = function() {
  return ‘Hello World’;
};
Any properties assigned to the exports object will be accessible from the return value of the require() function:
var hello = require('./hello.js');
console.log(hello.funcname()); // Print “Hello World”
You can also use module.exports instead of exports:
function funcname() { return 'Hello World'; }
module.exports = { funcname: funcname };
This alternative syntax makes it possible to assign a single object to exports (such as a class). We’ve previously discussed how you can build classes using prototypal inheritance. By making your classes separate modules, you can easily include them in your application:
// in class.js:
var Class = function() { … }
Class.prototype.funcname = function() {...}
module.exports = Class;
Then you can include your file using require() and make a new instance of your class:
// in another file:
var Class = require('./class.js');
var object = new Class(); // create new instance
Sharing variables between modules
Note that there is no global context in Node. Each script has it's own context, so including multiple modules does not pollute the current scope. var foo = 'bar'; in the top level scope of another module will not define foo in other modules.
What this means is that the only way to share variables and values between node modules is to include the same module in multiple files. Since modules are cached, you can use a shared module to store common data, such as configuration options:
// in config.js
var config = {
  foo: 'bar'
};
module.exports = config;
In a different module:
// in server.js
var config = require('./config.js');
console.log(config.foo);
However, Node module has a number of variables which are available by default. These are documented in the API docs: globals and process.
Some of the more interesting ones are:
| filename | The filename of the code being executed. |
| dirname | The name of the directory that the currently executing script resides in. |
| process | A object which is associated with the currently running process. In addition to variables, it has methods such as process.exit, process.cwd and process.uptime. |
| process.argv. | An array containing the command line arguments. The first element will be 'node', the second element will be the name of the JavaScript file. The next elements will be any additional command line arguments. |
| process.stdin, process.stout, process.stderr. | Streams which correspond to the standard input, standard output and standard error output for the current process. |
| process.env | An object containing the user environment of the current process. |
| require.main | When a file is run directly from Node, require.main is set to its module. |
The code below will print the values for the current script:
console.log('filename', filename);
console.log('dirname', dirname);
console.log('process.argv', process.argv);
console.log('process.env', process.env);
if(module === require.main) {
  console.log('This is the main module being run.');
}
require.main can be used to detect whether the module being currently run is the main module. This is useful when you want to do something else when a module is run standalone. For example, I make my test files runnable via node filename.js by including something like this:
// if this module is the script being run, then run the tests:
if (module === require.main) {
  var nodeunit_runner = require('nodeunit-runner');
  nodeunit_runner.run(__filename);
}
process.stdin, process.stdout and process.stderr are briefly discussed in the next chapter, where we discuss readable and writable streams.
Organizing modules
There are three ways in which you can require() files:
- using a relative path: foo = require('./lib/bar.js');
- using an absolute path: foo = require('/home/foo/lib/bar.js')
- using a search: foo = require('bar')
The first two are easy to understand. In the third case, Node starts at the current directory, and adds ./node_modules/, and attempts to load the module from that location. If the module is not found, then it moves to the parent directory and performs the same check, until the root of the filesystem is reached.</p
For example, if require('bar') would called in /home/foo/, the following locations would be searched until a match a found:
- /home/foo/node_modules/bar.js
- /home/node_modules/bar.js and
- /node_modules/bar.js
Loading modules in this way is easier than specifying a relative path, since you can move the files without worrying about the paths changing.
Directories as modules
You can organize your modules into directories, as long as you provide a point of entry for Node.
The easiest way to do this is to create the directory ./node_modules/mymodulename/, and put an index.js file in that directory. The index.js file will be loaded by default.
Alternatively, you can put a package.json file in the mymodulename folder, specifying the name and main file of the module:
{
  "name": "mymodulename",
  "main": "./lib/foo.js"
}
This would cause the file ./node_modules/mymodulename/lib/foo.js to be returned from require('mymodulename').
Generally, you want to keep a single ./node_modules folder in the base directory of your app. You can install new modules by adding files or directories to ./node_modules. The best way to manage these modules is to use npm, which is covered briefly in the next section.
8.2 npm
npm is the package manager used to distribute Node modules. I won't cover it in detail here, because the Internet does that already.
npm is awesome, and you should use it. Below are a couple of use cases.
8.2.1 Installing packages
The most common use case for npm is to use it for installing modules from other people:
npm search packagename
npm view packagename
npm install packagename
npm outdated
npm update packagename
Packages are installed under ./node_modules/ in the current directory.
8.2.2 Specifying and installing dependencies for your own app
npm makes installing your application on a new machine easy, because you can specify what modules you want to have in your application by adding a package.json file in the root of your application.
Here is a minimal package.json:
{ "name": "modulename",
  "description": "Foo for bar",
  "version": "0.0.1",
  "repository": {
    "type": "git",
    "url":  "git://github.com/mixu/modulename.git" },
  "dependencies": {
    "underscore": "1.1.x",
    "foo": "git+ssh://[email protected]:mixu/foo.git#0.4.1",
    "bar": "git+ssh://[email protected]:mixu/bar.git#master"
  },
  "private": true
}
This makes getting the right versions of the dependencies of your application a lot easier. To install the dependencies specified for your application, run:
npm install
8.2.3 Loading dependencies from a remote git repository
One of my favorite features is the ability to use git+ssh URLs to fetch remote git repositories. By specifying a URL like git+ssh://github.com:mixu/nwm.git#master, you can install a dependency directly from a remote git repository. The part after the hash refers to a tag or branch on the repository.
To list the installed dependencies, use:
npm ls
8.2.4 Specifying custom start, stop and test scripts
You can also use the "scripts" member of package.json to specify actions to be taken during various stages:
{ "scripts" :
  { "preinstall" : "./configure",
    "install" : "make && make install",
    "test" : "make test",
    "start": "scripts/start.js",
    "stop": "scripts/stop.js"
  }
}
In the example above, we specify what should happen before install and during install. We also define what happens when npm test, npm start and npm stop are called.
9. Node fundamentals: Timers, EventEmitters, Streams and Buffers
The building blocks of Node applications are:
- Streams Readable and writable streams an alternative way of interacting with (file|network|process) I/O.
- Buffers Buffers provide a binary-friendly, higher-performance alternative to strings by exposing raw memory allocation outside the V8 heap.
- Events Many Node.js core libraries emit events. You can use EventEmitters to implement this pattern in your own applications.
- Timers setTimeout for one-time delayed execution of code, setInterval for periodically repeating execution of code
- C/C++ Addons Provide the capability to use your own or 3rd party C/C++ libraries from Node.js
Note that I will not cover C/C++ addons, as this goes beyond the scope of the book.
9.1 Timers
The timers library consists of four global functions:
| setTimeout(callback, delay, [arg], [...]) | Schedule the execution of the given callback after delay milliseconds. Returns a timeoutId for possible use with clearTimeout(). Optionally, you can also pass arguments to the callback. |
| setInterval(callback, delay, [arg], [...]) | Schedule the repeated execution of callback every delay milliseconds. Returns a intervalId for possible use with clearInterval(). Optionally, you can also pass arguments to the callback. |
| clearTimeout(timeoutId) | Prevents a timeout from triggering. |
| clearInterval(intervalId) | Stops an interval from triggering. |
These functions can be used to schedule callbacks for execution. The setTimeout function is useful for performing housekeeping tasks, such as saving the state of the program to disk after a particular interval. The same functions are available in all major browsers:
// setting a timeout
setTimeout(function() {
  console.log('Foo');
}, 1000);
// Setting and clearing an interval
var counter = 0;
var interval = setInterval( function() {
  console.log('Bar', counter);
  counter++;
  if (counter >= 3) {
    clearInterval(interval);
  }
}, 1000);
While you can set a timeout or interval using a string argument (e.g. setTimeout(‘longRepeatedTask’, 5000), this is a bad practice since the string has to be dynamically evaluated (like using the eval() function, which is not recommended). Instead, use a variable or a named function as instead of a string.
Remember that timeouts and intervals are only executed when the execution is passed back to the Node event loop, so timings are not necessarily accurate if you have a long-running blocking task. So a long, CPU-intensive task which takes longer than the timeout/interval time will prevent those tasks from being run at their scheduled times.
9.2 EventEmitters
event.EventEmitter is a class which is used to provide a consistent interface for emitting (triggering) and binding callbacks to events. It is used internally in many of the Node core libraries and provides a solid foundation to build event-based classes and applications.
Using EventEmitters in your own objects
To create a class which extends EventEmitter, you can use utils.inherit():
var EventEmitter = require(‘events’).EventEmitter;
var util = require(‘util’);
// create the class
var MyClass = function () { … }
// augment the prototype using util.inherits
util.inherits(MyClass, EventEmitter);
MyClass.prototype.whatever = function() { … }
Adding listeners
EventEmitters allow you to add listeners - callbacks - to any arbitrarily named event (except newListener, which is special in EventEmitter). You can attach multiple callbacks to a single event, providing for flexibility. To add a listener, use EventEmitter.on(event, listener) or EventEmitter.addListener(event, listener) - they both do the same thing:
var obj = new MyClass();
obj.on(‘someevent’, function(arg1) { … });
You can use EventEmitter.once(event, listener) to add a callback which will only be triggered once, rather than every time the event occurs. This is a good practice, since you should keep the number of listeners to a minimum (in fact, if you have over 10 listerners, EventEmitter will warn you that you need to call emitter.setMaxListeners).
Triggering events
To trigger an event from your class, use EventEmitter.emit(event, [arg1], [arg2], [...]):
MyClass.prototype.whatever = function() {
  this.emit(‘someevent’, ‘Hello’, ‘World’);
};
The emit function takes an unlimited number of arguments, and passes those on to the callback(s) associated with the event. You can remove event listeners using EventEmitter.removeListener(event, listener) or EventEmitter.removeAllListeners(event), which remove either one listener, or all the listeners associated with a particular event.
How EventEmitters work
Now that you have seen the API exposed by EventEmitters, how would something like this be implemented? While there are many things to take care of, the simplest "EventEmitter" would be an object hash containing functions:
var SimpleEE = function() {
  this.events = {};
};
SimpleEE.prototype.on = function(eventname, callback) {
  this.events[eventname] || (this.events[eventname] = []);
  this.events[eventname].push(callback);
};
SimpleEE.prototype.emit = function(eventname) {
  var args = Array.prototype.slice.call(arguments, 1);
  if (this.events[eventname]) {
    this.events[eventname].forEach(function(callback) {
      callback.apply(this, args);
    });
  }
};
// Example using the event emitter
var emitter = new SimpleEE();
emitter.on('greet', function(name) {
  console.log('Hello, ' + name + '!' );
});
emitter.on('greet', function(name) {
  console.log('World, ' + name + '!' );
});
['foo', 'bar', 'baz'].forEach(function(name) {
  emitter.emit('greet', name);
});
It's really pretty simple - though the Node core EventEmitter class has many additional features (such as being able to attach multiple callbacks per event, removing listeners, calling listeners only once, performance-related improvements etc.).
EventEmitters extremely useful for abstracting event-based interactions, and if this introduction seems a bit too theoretical - don't worry. You'll see EventEmitters used in many different situations and will hopefully learn to love them. EventEmitters are also used extensively in Node core libraries.
One thing that you should be aware of is that EventEmitters are not “privileged” in any way - despite having “Event” in their name, they are executed just like any other code - emitting events does not trigger the event loop in any special way. Of course, you should use asynchronous functions for I/O in your callbacks, but EventEmitters are simply a standard way of implementing this kind of interface. You can verify this by reading the source code for EventEmitters on Github.
9.3 Streams
We’ve discussed the three main alternatives when it comes to controlling execution: Sequential, Full Parallel and Parallel. Streams are an alternative way of accessing data from various sources such as the network (TCP/UDP), files, child processes and user input. In doing I/O, Node offers us multiple options for accessing the data:
| Synchoronous | Asynchronous | |
| Fully buffered | readFileSync() | readFile() |
| Partially buffered (streaming) | readSync() | read(), createReadStream() |
The difference between these is how the data is exposed, and the amount of memory used to store the data.
Fully buffered access
// Fully buffered access
[100 Mb file]
-> 1. [allocate 100 Mb buffer]
-> 2. [read and return 100 Mb buffer]
Fully buffered function calls like readFileSync() and readFile() expose the data as one big blob. That is, reading is performed and then the full set of data is returned either in synchronous or asynchronous fashion.
With these fully buffered methods, we have to wait until all of the data is read, and internally Node will need to allocate enough memory to store all of the data in memory. This can be problematic - imagine an application that reads a 1 GB file from disk. With only fully buffered access we would need to use 1 GB of memory to store the whole content of the file for reading - since both readFile and readFileSync return a string containing all of the data.
Partially buffered (streaming) access
// Streams (and partially buffered reads)
[100 Mb file]
-> 1. [allocate small buffer]
-> 2. [read and return small buffer]
-> 3. [repeat 1&2 until done]
Partially buffered access methods are different. They do not treat data input as a discrete event, but rather as a series of events which occur as the data is being read or written. They allow us to access data as it is being read from disk/network/other I/O.
Partially buffered methods, such as readSync() and read() allow us to specify the size of the buffer, and read data in small chunks. They allow for more control (e.g. reading a file in non-linear order by skipping back and forth in the file).
Streams
However, in most cases we only want to read/write through the data once, and in one direction (forward). Streams are an abstraction over partially buffered data access that simplify doing this kind of data processing. Streams return smaller parts of the data (using a Buffer), and trigger a callback when new data is available for processing.
Streams are EventEmitters. If our 1 GB file would, for example, need to be processed in some way once, we could use a stream and process the data as soon as it is read. This is useful, since we do not need to hold all of the data in memory in some buffer: after processing, we no longer need to keep the data in memory for this kind of application.
The Node stream interface consists of two parts: Readable streams and Writable streams. Some streams are both readable and writable.
Readable streams
The following Node core objects are Readable streams:
| Files fs.createReadStream(path, [options]) | Returns a new ReadStream object (See Readable Stream). |
| HTTP (Server) http.ServerRequest | The request object passed when processing the request/response callback for HTTP servers. |
| HTTP (Client) http.ClientResponse | The response object passed when processing the response from an HTTP client request. |
| TCP net.Socket | Construct a new socket object. |
| Child process child.stdout | The stdout pipe for child processes launched from Node.js |
| Child process child.stderr | The stderr pipe for child processes launched from Node.js |
| Process process.stdin | A Readable Stream for stdin. The stdin stream is paused by default, so one must call process.stdin.resume() to read from it. |
Readable streams emit the following events:
| Event: ‘data’ | Emits either a Buffer (by default) or a string if setEncoding() was used. |
| Event: ‘end’ | Emitted when the stream has received an EOF (FIN in TCP terminology). Indicates that no more 'data' events will happen. |
| Event: ‘error’ | Emitted if there was an error receiving data. |
To bind a callback to an event, use stream.on(eventname, callback). For example, to read data from a file, you could do the following:
var fs = require('fs');
var file = fs.createReadStream('./test.txt');
file.on('error', function(err) {
  console.log('Error '+err);
  throw err;
});
file.on('data', function(data) {
  console.log('Data '+data);
});
file.on('end', function(){
  console.log('Finished reading all of the data');
});
Readable streams have the following functions:
| pause() | Pauses the incoming 'data' events. |
| resume() | Resumes the incoming 'data' events after a pause(). |
| destroy() | Closes the underlying file descriptor. Stream will not emit any more events. |
Writable streams
The following Node core objects are Writable streams:
| Files fs.createWriteStream(path, [options]) | Returns a new WriteStream object (See Writable Stream). |
| HTTP (Server) http.ServerResponse | |
| HTTP (Client) http.ClientRequest | |
| TCP net.Socket | |
| Child process child.stdin | |
| Process process.stdout | A Writable Stream to stdout. |
| Process process.stderr | A writable stream to stderr. Writes on this stream are blocking. |
Writable streams emit the following events:
| Event: ’drain’ | After a write() method returned false, this event is emitted to indicate that it is safe to write again. |
| Event: ’error’ | Emitted on error with the exception exception. |
Writable streams have the following functions:
| write(string, encoding='utf8') | Writes string with the given encoding to the stream. |
| end() | Terminates the stream with EOF or FIN. This call will allow queued write data to be sent before closing the stream. |
| destroy() | Closes the underlying file descriptor. Stream will not emit any more events. Any queued write data will not be sent. |
Lets read from stdin and write to a file:
var fs = require('fs');

var file = fs.createWriteStream('./out.txt');

process.stdin.on('data', function(data) {
  file.write(data);
});
process.stdin.on('end', function() {
  file.end();
});
process.stdin.resume(); // stdin in paused by default
Running the code above will write everything you type in from stdin to the file out.txt, until you hit Ctrl+d (e.g. the end of file indicator in Linux).
You can also pipe readable and writable streams using readableStream.pipe(destination, [options]). This causes the content from the read stream to be sent to the write stream, so the program above could have been written as:
var fs = require('fs');
process.stdin.pipe(fs.createWriteStream('./out.txt'));
process.stdin.resume();
9.4 Buffers - working with binary data
Buffers in Node are a higher-performance alternative to strings. Since Buffers represent raw C memory allocation, they are more appropriate for dealing with binary data than strings. There are two reasons why buffers are useful:
They are allocated outside of V8, meaning that they are not managed by V8. While V8 is generally high performance, sometimes it will move data unnecessarily. Using a Buffer allows you to work around this and work with the memory more directly for higher performance.
They do not have an encoding, meaning that their length is fixed and accurate. Strings support encodings such as UTF-8, which internally stores many foreign characters as a sequence of bytes. Manipulating strings will always take into account the encoding, and will transparently treat sequences of bytes as single characters. This causes problems for binary data, since binary data (like image files) are not encoded as characters but rather as bytes - but may coincidentally contain byte sequences which would be interpreted as single UTF-8 characters.
Working with buffers is a bit more complicated than working with strings, since they do not support many of the functions that strings do (e.g. indexOf). Instead, buffers act like fixed-size arrays of integers. The Buffer object is global (you don’t have to use require() to access it). You can create a new Buffer and work with it like an array of integers:
// Create a Buffer of 10 bytes
var buffer = new Buffer(10);
// Modify a value
buffer[0] = 255;
// Log the buffer
console.log(buffer);
// outputs: <Buffer ff 00 00 00 00 00 4a 7b 08 3f>
Note how the buffer has it’s own representation, in which each byte is shown a hexadecimal number. For example, ff in hex equals 255, the value we just wrote in index 0. Since Buffers are raw allocations of memory, their content is whatever happened to be in memory; this is why there are a number of different values in the newly created buffer in the example.
Buffers do not have many predefined functions and certainly lack many of the features of strings. For example, strings are not fixed size, and have convenient functions such as String.replace(). Buffers are fixed size, and only offer the very basics:
| new Buffer(size) new Buffer(str, encoding='utf8') new Buffer(array) | Buffers can be created: 1) with a fixed size, 2) from an existing string and 3) from an array of octets |
| buffer.write(string, offset=0, encoding='utf8') | Write a string to the buffer at [offset] using the given encoding. |
| buffer.isBuffer(obj) | Tests if obj is a Buffer. |
| buffer.byteLength(string, encoding='utf8') | Gives the actual byte length of a string. This is not the same as String.prototype.length since that returns the number of characters in a string. |
| buffer.length | The size of the buffer in bytes. |
| buffer.copy(targetBuffer, targetStart=0, sourceStart=0, sourceEnd=buffer.length) | Does a memcpy() between buffers. |
| buffer.slice(start, end=buffer.length) | Returns a new buffer which references the same memory as the old, but offset and cropped by the start and end indexes. Modifying the new buffer slice will modify memory in the original buffer! |
| buffer.toString(encoding, start=0, end=buffer.length) | Decodes and returns a string from buffer data encoded with encoding beginning at start and ending at end. |
However, if you need to use the string functions on buffers, you can convert them to strings using buffer.toString() and you can also convert strings to buffers using new Buffer(str). Note that Buffers offer access to the raw bytes in a string, while Strings allow you to operate on charaters (which may consist of one or more bytes). For example:
var buffer = new Buffer('Hyvää päivää!'); // create a buffer containing “Good day!” in Finnish
var str = 'Hyvää päivää!'; // create a string containing “Good day!” in Finnish
// log the contents and lengths to console
console.log(buffer);
console.log('Buffer length:', buffer.length);
console.log(str);
console.log('String length:', str.length);
If you run this example, you will get the following output:
<Buffer 48 79 76 c3 a4 c3 a4 20 70 c3 a4 69 76 c3 a4 c3 a4 21>
Buffer length: 18
Hyvää päivää!
String length: 13
Note how buffer.length is 18, while string.length is 13 for the same content. This is because in the default UTF-8 encoding, the “a with dots” character is represented internally by two characters (“c3 a4” in hexadecimal). The Buffer allows us to access the data in it’s internal representation and returns the actual number of bytes used, while String takes into account the encoding and returns the number of characters used. When working with binary data, we frequently need to access data that has no encoding - and using Strings we could not get the correct length in bytes. More realistic examples could be, for example, reading an image file from a TCP stream, or reading a compressed file, or some other case where binary data will be accessed.
10. Node.js: HTTP, HTTPS
Just a reminder: the coverage is limited to common use cases; I will go into more depth in the chapter on Controllers about specific topics such as routing and sessions.
10.1 HTTP server
| HTTP server | |
| Methods http.createServer([requestListener]) server.listen(port, [hostname], [callback]) server.listen(path, [callback]) server.close() | Events request connection close checkContinue upgrade clientError |
| Server request Methods setEncoding(encoding=null) pause() resume() Events data end close Properties method url headers trailers httpVersion connection | Server response Methods writeContinue() writeHead(statusCode, [reasonPhrase], [headers]) setHeader(name, value) getHeader(name) removeHeader(name) write(chunk, encoding='utf8') addTrailers(headers) end([data], [encoding]) Properties statusCode |
Creating an HTTP server is simple: after requiring the http module, you call createServer, then instruct the server to listen on a particular port:
var http = require('http');
var server = http.createServer(function(request, response) {
  // Read the request, and write back to the response
});
server.listen(8080, 'localhost');
The callback function you pass to http.createServer is called every time a client makes a request to the server. The callback should take two parameters - a request and a response - and send back HTML or some other output to the client.
The request is used to determine what should be done (e.g. what path on the server was requested, what GET and POST parameters were sent). The response allows us to write output back to the client.
The other API functions related to starting the HTTP server and receiving requests and closing the server are:
| http.createServer(requestListener) | Returns a new web server object. The requestListener is a function which is automatically added to the 'request' event. |
| server.listen(port, [hostname], [callback]) | Begin accepting connections on the specified port and hostname. If the hostname is omitted, the server will accept connections directed to any IPv4 address (INADDR_ANY). To listen to a unix socket, supply a filename instead of port and hostname. This function is asynchronous. The last parameter callback will be called when the server has been bound to the port. |
| server.on([eventname], [callback]) | Allows you to bind callbacks to events such as "request", "upgrade" and "close". |
| server.close() | Stops the server from accepting new connections. |
The server object returned by http.createServer() is an EventEmitter (see the previous chapter) - so you can also bind new request handlers using server.on():
// create a server with no callback bound to 'request'
var server = http.createServer().listen(8080, 'localhost');
// bind a listener to the 'request' event
server.on('request', function(req, res) {
  // do something with the request
});
The other events that the HTTP server emits are not particularly interesting for daily use, so let's look at the Request and Response objects.
10.1.1 The Server Request object - http.ServerRequest
The first parameter of the request handler callback is a ServerRequest object. ServerRequests are Readable Streams, so we can bind to the "data" and "end" events to access the request data (see further below).
The Request object contains three interesting properties:
| request.method | The request method as a string. Read only. Example: 'GET', ‘POST’, 'DELETE'. |
| request.url | Request URL string. Example: ‘/’, ‘/user/1’, /‘post/new/?param=value’ |
| request.headers | A read only object, indexed by the name of the header (converted to lowercase), containing the values of the headers. Example: see below. |
request.url The most important property is request.url, which is used to determine which page was requested and what to do with the request.
In the simple messaging application example, we briefly saw how this property was used to determine what to do with client requests. We will go into further depth when we discuss routing in web applications in the chapter on Controllers.
Checking request.method tells us what HTTP method was used to retrieve the page, the most common of which are GET and POST. GET requests retrieve a resource, and may have additional parameters passed as part of request.url. POST requests are generally the result of form submissions and their data must be read from the request separately (see below).
request.headers allows us read-only access to the headers. HTTP cookies are transmitted in the headers, so we need to parse the headers to access the cookies. User agent information is also passed in the request headers.
You can access all of this information through the first parameter of your request handler callback:
var http = require('http');
var server = http.createServer(function(request, response) {
  console.log(request);
});
server.listen(8080, 'localhost');
Once you point your browser to http://localhost:8080/, this will print out all the different properties of the current HTTP request, which includes a number of more advanced properties:
{
  socket: { … },
  connection: { … },
  httpVersion: '1.1',
  complete: false,
  headers:
    {
      host: 'localhost:8080',
      connection: 'keep-alive',
      'cache-control': 'max-age=0',
      'user-agent': 'Mozilla/5.0 (X11; Linux x86_64) ...',
      accept: 'application/xml,application/xhtml+xml ...',
      'accept-encoding': 'gzip,deflate,sdch',
      'accept-language': 'en-US,en;q=0.8',
      'accept-charset': 'ISO-8859-1,utf-8;q=0.7,;q=0.3'
     },
  trailers: {},
  readable: true,
  url: '/',
  method: 'GET',
  statusCode: null,
  client:  { … },
  httpVersionMajor: 1,
  httpVersionMinor: 1,
  upgrade: false
}
10.1.1.1 Parsing data
There are several different formats through which an HTTP server can receive requests. The most commonly used formats are:
- HTTP GET - passed via request.url
- HTTP POST requests - passed as “data” events
- cookies - passed via request.headers.cookies
10.1.1.2 Parsing GET requests
The request.url parameter contains the URL for the current request. GET parameters are passed as a part of this string. The URL module provides three functions which can be used to work with URLs:
url.parse(urlStr, parseQueryString = false): Parses a URL string and returns an object which contains the various parts of the URL.url.format(urlObj): Accepts a parsed URL object and returns the string. Does the reverse of url.parse().url.resolve(from, to): Resolves a given URL relative to a base URL as a browser would for an anchor tag.
The url.parse() function can be used to parse a URL:
var url = require('url');
var url_parts = url.parse(req.url, true);
By passing true as the second parameter (parseQueryString), you get an additional "query" key that contains the parsed query string. For example:
var url = require('url');
console.log( url.parse(
    'http://user:[email protected]:8080/p/a/t/h?query=string#hash', true
  ));
Returns the following object:
{
  href: 'http://user:[email protected]:8080/p/a/t/h?query=string#hash',
  protocol: 'http:',
  host: 'user:[email protected]:8080',
  auth: 'user:pass',
  hostname: 'host.com',
  port: '8080',
  pathname: '/p/a/t/h',
  search: '?query=string',
  query: { query: 'string' },
  hash: '#hash',
  slashes: true
}
Of these result values, there are three are most relevant for data prosessing in the controller: pathname (the URL path), query (the query string) and hash (the hash fragment).
10.1.1.3 Parsing POST requests
Post requests transmit their data as the body of the request. To access the data, you can buffer the data to a string in order to parse it. The data is accessible through the “data” events emitted by the request. When all the data has been received, the “end” event is emitted:
function parsePost(req, callback) {
  var data = '';
  req.on('data', function(chunk) {
    data += chunk;
  });
  req.on('end', function() {
    callback(data);
  });
}
POST requests can be in multiple different encodings. The two most common encodings are: application/x-www-form-urlencoded and multipart/form-data.
application/x-www-form-urlencoded
name=John+Doe&gender=male&family=5&city=kent&city=miami&other=abc%0D%0Adef&nickname=J%26D
application/x-www-form-urlencoded data is encoded like a GET request. It's the default encoding for forms and used for most textual data.
The QueryString module provides two functions:
querystring.parse(str, sep=’&’, eq=’=’): Parses a GET query string and returns an object that contains the parameters as properties with values. Example: qs.parse(‘a=b&c=d’) would return {a: ‘b’, c: ‘d’}.querystring.stringify(obj, sep=’&’, eq=’=’): Does the reverse of querystring.parse(); takes an object with properties and values and returns a string. Example: qs.stringify({a: ‘b’}) would return ‘a=b’.
You can use querystring.parse to convert POST data into an object:
var qs = require('querystring');
var data = '';
req.on('data', function(chunk) {
  data += chunk;
});
req.on('end', function() {
  var post = qs.parse(data);
  console.log(post);
});
multipart/form-data
Content-Type: multipart/form-data; boundary=AaB03x

--AaB03x
Content-Disposition: form-data; name="submit-name"

Larry
--AaB03x
Content-Disposition: form-data; name="files"; filename="file1.txt"
Content-Type: text/plain

... contents of file1.txt ...
--AaB03x--
multipart/form-data is used for binary files. This encoding is somewhat complicated to decode, so I won't provide a snippet. Instead, have a look at how it's done in:
10.1.2 The Server Response object - http.ServerResponse
The second parameter of the request handler callback is a ServerResponse object. ServerResponses are Writable Streams, so we write() data and call end() to finish the response.
10.1.2.1 Writing response data
The code below shows how you can write back data from the server.
var http = require('http'),
    url = require('url');
var server = http.createServer().listen(8080, 'localhost');
server.on('request', function(req, res) {
  var url_parts = url.parse(req.url, true);
  switch(url_parts.pathname) {
    case '/':
    case '/index.html':
      res.write('<html><body>Hello!</body></html>');
      break;
    default:
      res.write('Unknown path: ' + JSON.stringify(url_parts));
  }
  res.end();
});
Note that response.end() must be called on each response to finish the response and close the connection.
10.1.2.2 Common response headers
Some common uses forHTTP headers include:
- Specifying the content type (content-type)
- Redirecting requests (location)
- Specifying the filename and size of a download (content-disposition, content-length)
- Setting cookies (set-cookie)
- Specifying compression (content-encoding)
- Controlling caching (cache-control, expires, etag)
I will only cover the first two use cases, since the focus here is on how to use the HTTP API rather than on HTTP 1.1 itself.
Headers and write()
HTTP headers have to be sent before the request data is sent (that's why they are called headers).
Headers can be written in two ways:
- Explicitly using
response.writeHead(statusCode, [reasonPhrase], [headers]). In this case, you have to specify all the headers in one go, along with the HTTP status code and an optional human-readable reasonPhrase. - Implicitly: the first time
response.write()is called, the currently set implicit headers are sent.
The API has the details:
| response.writeHead(statusCode, [reasonPhrase], [headers]) | Sends a response header to the request. The status code is a 3-digit HTTP status code, like 404. The last argument, headers, are the response headers. Optionally one can give a human-readable reasonPhrase as the second argument. |
| response.statusCode | When using implicit headers (not calling response.writeHead() explicitly), this property controls the status code that will be send to the client when the headers get flushed. |
| response.setHeader(name, value) | Sets a single header value for implicit headers. If this header already exists in the to-be-sent headers, it's value will be replaced. Use an array of strings here if you need to send multiple headers with the same name. |
| response.getHeader(name) | Reads out a header that's already been queued but not sent to the client. Note that the name is case insensitive. This can only be called before headers get implicitly flushed. |
| response.removeHeader(name) | Removes a header that's queued for implicit sending. |
Generally, using implicit headers is simpler since you can change the individual headers up until the point when the first call to response.write() is made.
Setting the content/type header
Browsers expect to receive a content-type header for all content. This header contains the MIME type for the content/file that is sent, which is used to determine what the browser should do with the data (e.g. display it as an image).
In our earlier examples, we did not set a content-type header, because the examples did not serve content other than HTML and plaintext. However, in order to support binary files like images and in order to send formatted data such as JSON and XML back, we need to explicitly specify the content type.
Usually, the mime type is determined by the server based on the file extension:
var map = {
  '.ico': 'image/x-icon',
  '.html': 'text/html',
  '.js': 'text/javascript',
  '.json': 'application/json',
  '.css': 'text/css',
  '.png': 'image/png'
};
var ext = '.css';
if(map[ext]) {
  console.log('Content-type', map[ext]);
}
There are ready-made libraries that you can use to determine the mime type of a file, such as:
To set the content-type header from a filename:
var ext = require('path').extname(filename);
if(map[ext]) {
  res.setHeader('Content-type', map[ext]);
}
We will look at how to read files in the next chapter.
Redirecting to a different URL
Redirects are performed using the Location: header. For example, to redirect to /index.html:
res.statusCode = 302;
res.setHeader('Location', '/index.html');
res.end();
10.2 HTTP client
There is also a HTTP client API, which allows you to make HTTP requests and read content from other websites.
| ### HTTP client Methods http.request(options, callback) http.get(options, callback) | |
| Client request Methods write(chunk, encoding='utf8') end([data], [encoding]) abort() setTimeout(timeout, [callback]) setNoDelay(noDelay=true) setSocketKeepAlive(enable=false, [initialDelay]) Events response socket upgrade continue | Client response Methods setEncoding(encoding=null) pause() resume() Events data end close Properties statusCode httpVersion headers trailers |
10.2.1 Issuing a simple GET request
http.get(options, callback) | A convinience method to make HTTP GET requests. |
http.get() returns a http.ClientRequest object, which is a Writable Stream.
The callback passed to http.get() will receive a http.ClientResponse object when the request is made. The ClientResponse is a Readable Stream.
To send a simple GET request, you can use http.get. You need to set the following options:
- host: the domain or IP address of the server
- port: the port (e.g. 80 for HTTP)
- path: the request path, including the query string (e.g. 'index.html?page=12')
To read the response data, you should attach a callback to the 'data' and 'end' events of the returned object. You will most likely want to store the data somewhere from the 'data' events, then process it as a whole on the 'end' event.
The following code issues a GET request to www.google.com/, reads the 'data' and 'end' events and outputs to the console.
var http = require('http');
var options = {
    host: 'www.google.com',
    port: 80,
    path: '/'
  };
var req = http.get(options, function(response) {
  // handle the response
  var res_data = '';
  response.on('data', function(chunk) {
    res_data += chunk;
  });
  response.on('end', function() {
    console.log(res_data);
  });
});
req.on('error', function(e) {
  console.log("Got error: " + e.message);
});
To add GET query parameters from an object, use the querystring module:
var qs = require('querystring');
var options = {
    host: 'www.google.com',
    port: 80,
    path: '/'+'?'+qs.stringify({q: 'hello world'})
  };
// .. as in previous example
As you can see above, GET parameters are sent as a part of the request path.
10.2.2 Issuing POST, DELETE and other methods
http.request(options, callback) | Issue an HTTP request. Host, port and path are specified in the options object parameter. Calls the callback with an http.ClientRequest object with the new request. |
To issue POST, DELETE or other requests, you need to use http.request and set the method in the options explicitly:
var opts = {
    host: 'www.google.com',
    port: 80,
    method: 'POST'
    path: '/',
    headers: {}
  };
To send the data along with the POST request, call req.write() with the data you want to send along with the request before calling req.end(). To ensure that the receiving server can decode the POST data, you should also set the content-type.
There are two common encodings used to encode POST request data: application/x-www-form-urlencoded
// POST encoding
opts.headers['Content-Type'] = 'application/x-www-form-urlencoded';
req.data = qs.stringify(req.data);
opts.headers['Content-Length'] = req.data.length;
and application/json:
// JSON encoding
opts.headers['Content-Type'] = 'application/json';
req.data = JSON.stringify(req.data);
opts.headers['Content-Length'] = req.data.length;
Making a request is very similar to making a GET request:
var req = http.request(opts, function(response) {
  response.on('data', function(chunk) {
    res_data += chunk;
  });
  response.on('end', function() {
    callback(res_data);
  });
});
req.on('error', function(e) {
  console.log("Got error: " + e.message);
});
// write the data
if (opts.method != 'GET') {
  req.write(req.data);
}
req.end();
Note, however, that you need to call req.end() after http.request(). This is because http.ClientRequest supports sending a request body (with POST or other data) and if you do not call req.end(), the request remains "pending" and will most likely not return any data before you end it explicitly.
10.2.3 Writing a simple HTTP proxy
Since the HTTP server and client expose Readable/Writable streams, we can write a simple HTTP proxy simply by pipe()ing the two together.
The ServerRequest is Readable, while the ClientRequest is Writable. Similarly, the ClientResponse is Readable, while the ServerResponse is Writable.
var server = http.createServer(function(sreq, sres) {
  var url_parts = url.parse(sreq.url);
  var opts = {
    host: 'google.com',
    port: 80,
    path: url_parts.pathname,
    method: sreq.method,
    headers: sreq.headers
  };
  var creq = http.request(opts, function(cres) {
    sres.writeHead(cres.statusCode, cres.headers);
    cres.pipe(sres); // pipe client to server response
  });
  sreq.pipe(creq); // pipe server to client request
});
server.listen(80, '0.0.0.0');
console.log('Server running.');
The code above causes any requests made to http://localhost:80/ to be proxied to Google. You can pass queries too, such as http://localhost:80/search?q=Node.js
10.3 HTTPS server and client
The HTTPS server and client API is almost identical to the HTTP API, so pretty much everything said above applies to them. In fact, the client API is the same, and the HTTPS server only differs in that it needs a certificate file.
The HTTPS server library allows you to serve files over SSL/TLS. To get started, you need to have a SSL certificate from a certificate authority or you need to generate one yourself. Of course, self-generated certificates will generally trigger warnings in the browser.
10.3.1 Configuration: generating your own certificate
Here is how you can generate a self-signed certificate:
openssl genrsa -out privatekey.pem 1024
openssl req -new -key privatekey.pem -out certrequest.csr
openssl x509 -req -in certrequest.csr -signkey privatekey.pem -out certificate.pem
Note that this certificate will trigger warnings in your browser, since it is self-signed.
10.3.2 Starting the server
To start the HTTPS server, you need to read the private key and certificate. Note that readFileSync is used in this case, since blocking to read the certificates when the server starts is acceptable:
// HTTPS
var https = require('https');
// read in the private key and certificate
var pk = fs.readFileSync('./privatekey.pem');
var pc = fs.readFileSync('./certificate.pem');
var opts = { key: pk, cert: pc };
// create the secure server
var serv = https.createServer(opts, function(req, res) {
  console.log(req);
  res.end();
});
// listen on port 443
serv.listen(443, '0.0.0.0');
Note that on Linux, you may need to run the server with higher privileges to bind to port 443. Other than needing to read a private key and certificate, the HTTPS server works like the HTTP server.
11. File system
The file system functions consist of file I/O and directory I/O functions. All of the file system functions offer both synchronous (blocking) and asynchronous (non-blocking) versions. The difference between these two is that the synchronous functions (which have “Sync” in their name) return the value directly and prevent Node from executing any code while the I/O operation is being performed:
var fs = require('fs');
var data = fs.readFileSync('./index.html', 'utf8');
// wait for the result, then use it
console.log(data);
Asynchronous functions return the value as a parameter to a callback given to them:
var fs = require('fs');
fs.readFile('./index.html', 'utf8', function(err, data) {
  // the data is passed to the callback in the second argument
  console.log(data);
});
The table below lists all the asynchronous functions in the FS API. These functions have synchronous versions as well, but I left them out to make the listing more readable.
You should use the asynchronous version in most cases, but in rare cases (e.g. reading configuration files when starting a server) the synchronous version is more appropriate. Note that the asynchronous versions require a bit more thought, since the operations are started immediately and may finish in any order:
fs.readFile('./file.html', function (err, data) {
  // ...
});
fs.readFile('./other.html', function (err, data) {
  // ..
});
These file reads might complete in any order depending on how long it takes to read each file. The simplest solution is to chain the callbacks:
fs.readFile('./file.html', function (err, data) {
   // ...
   fs.readFile('./other.html', function (err, data) {
      // ...
   });
});
However, we can do better by using the control flow patterns discussed in the chapter on control flow.
11.1 Files: reading and writing
Fully buffered reads and writes are fairly straightforward: call the function and pass in a String or a Buffer to write, and then check the return value.
Recipe: Reading a file (fully buffered)
fs.readFile('./index.html', 'utf8', function(err, data) {
  // the data is passed to the callback in the second argument
  console.log(data);
});
Recipe: Writing a file (fully buffered)
fs.writeFile('./results.txt', 'Hello World', function(err) {
  if(err) throw err;
  console.log('File write completed');
});
When we want to work with files in smaller parts, we need to open(), get a file descriptor and then work with that file descriptor.
fs.open(path, flags, [mode], [callback]) supports the following flags:
- 'r' - Open file for reading. An exception occurs if the file does not exist.
- 'r+' - Open file for reading and writing. An exception occurs if the file does not exist.
- 'w' - Open file for writing. The file is created (if it does not exist) or truncated (if it exists).
- 'w+' - Open file for reading and writing. The file is created (if it does not exist) or truncated (if it exists).
- 'a' - Open file for appending. The file is created if it does not exist.
- 'a+' - Open file for reading and appending. The file is created if it does not exist.
mode refers to the permissions to use in case a new file is created. The default is 0666.
Recipe: Opening, writing to a file and closing it (in parts)
fs.open('./data/index.html', 'w', function(err, fd) {
  if(err) throw err;
  var buf = new Buffer('bbbbb\n');
  fs.write(fd, buf, 0, buf.length, null, function(err, written, buffer) {
    if(err) throw err;
    console.log(err, written, buffer);
    fs.close(fd, function() {
      console.log('Done');
    });
  });
});
The read() and write() functions operate on Buffers, so in the example above we create a new Buffer() from a string. Note that built-in readable streams (e.g. HTTP, Net) generally return Buffers.
Recipe: Opening, seeking to a position, reading from a file and closing it (in parts)
  fs.open('./data/index.html', 'r', function(err, fd) {
    if(err) throw err;
    var str = new Buffer(3);
    fs.read(fd, buf, 0, buf.length, null, function(err, bytesRead, buffer) {
      if(err) throw err;
      console.log(err, bytesRead, buffer);
      fs.close(fd, function() {
        console.log('Done');
      });
    });
  });
11.2 Directories: read, create & delete
Recipe: Reading a directory
Reading a directory returns the names of the items (files, directories and others) in it.
var path = './data/';
fs.readdir(path, function (err, files) {
  if(err) throw err;
  files.forEach(function(file) {
    console.log(path+file);
    fs.stat(path+file, function(err, stats) {
      console.log(stats);
    });
  });
});
fs.stat() gives us more information about each item. The object returned from fs.stat looks like this:
{ dev: 2114,
  ino: 48064969,
  mode: 33188,
  nlink: 1,
  uid: 85,
  gid: 100,
  rdev: 0,
  size: 527,
  blksize: 4096,
  blocks: 8,
  atime: Mon, 10 Oct 2011 23:24:11 GMT,
  mtime: Mon, 10 Oct 2011 23:24:11 GMT,
  ctime: Mon, 10 Oct 2011 23:24:11 GMT }
atime, mtime and ctime are Date instances. The stat object also has the following functions:
- stats.isFile()
- stats.isDirectory()
- stats.isBlockDevice()
- stats.isCharacterDevice()
- stats.isSymbolicLink() (only valid with fs.lstat())
- stats.isFIFO()
- stats.isSocket()
The Path module has a set of additional functions for working with paths, such as:
| path.normalize(p) | Normalize a string path, taking care of '..' and '.' parts. |
| path.join([path1], [path2], [...]) | Join all arguments together and normalize the resulting path. |
| path.resolve([from ...], to) | Resolves to to an absolute path. If to isn't already absolute from arguments are prepended in right to left order, until an absolute path is found. If after using all from paths still no absolute path is found, the current working directory is used as well. The resulting path is normalized, and trailing slashes are removed unless the path gets resolved to the root directory. |
| fs.realpath(path, [callback]) fs.realpathSync(path) | Resolves both absolute (‘/path/file’) and relative paths (‘../../file’) and returns the absolute path to the file. |
| path.dirname(p) | Return the directory name of a path. Similar to the Unix dirname command. |
| path.basename(p, [ext]) | Return the last portion of a path. Similar to the Unix basename command. |
| path.extname(p) | Return the extension of the path. Everything after the last '.' in the last portion of the path. If there is no '.' in the last portion of the path or the only '.' is the first character, then it returns an empty string. |
| path.exists(p, [callback]) path.existsSync(p) | Test whether or not the given path exists. Then, call the callback argument with either true or false. |
Recipe: Creating and deleting a directory
fs.mkdir('./newdir', 0666, function(err) {
  if(err) throw err;
  console.log('Created newdir');
  fs.rmdir('./newdir', function(err) {
    if(err) throw err;
    console.log('Removed newdir');
  });
});
Using Readable and Writable streams
Readable and Writable streams are covered in Chapter 9.
Recipe: Reading a file and writing to another file
var file = fs.createReadStream('./data/results.txt', {flags: 'r'} );
var out = fs.createWriteStream('./data/results2.txt', {flags: 'w'});
file.on('data', function(data) {
  console.log('data', data);
  out.write(data);
});
file.on('end', function() {
  console.log('end');
  out.end(function() {
    console.log('Finished writing to file');
    test.done();
  });
});
You can also use pipe():
var file = fs.createReadStream('./data/results.txt', {flags: 'r'} );
var out = fs.createWriteStream('./data/results2.txt', {flags: 'w'});
file.pipe(out);
Recipe: Appending to a file
var file = fs.createWriteStream('./data/results.txt', {flags: 'a'} );
file.write('HELLO!\n');
file.end(function() {
  test.done();
});
Practical example
Since Node makes it very easy to launch multiple asynchronous file accesses, you have to be careful when performing large amounts of I/O operations: you might exhaust the available number of file handles (a limited operating system resource used to access files). Furthermore, since the results are returned in a asynchronous manner which does not guarantee completion order, you will most likely want to coordinate the order of execution using the control flow patterns discussed in the previous chapter. Let’s look at an example.
Example: searching for a file in a directory, traversing recursively
In this example, we will search for a file recursively starting from a given path. The function takes three arguments: a path to search, the name of the file we are looking for, and a callback which is called when the file is found.
Here is the naive version: a bunch of nested callbacks, no thought needed:
var fs = require('fs');

function findFile(path, searchFile, callback) {
  fs.readdir(path, function (err, files) {
    if(err) { return callback(err); }
    files.forEach(function(file) {
      fs.stat(path+'/'+file, function() {
        if(err) { return callback(err); }
        if(stats.isFile() && file == searchFile) {
          callback(undefined, path+'/'+file);
          }
        } else if(stats.isDirectory()) {
          findFile(path+'/'+file, searchFile, callback);
        }
      });
    });
  });
}

findFile('./test', 'needle.txt', function(err, path) {
  if(err) { throw err; }
  console.log('Found file at: '+path);
});
Splitting the function into smaller functions makes it somewhat easier to understand:
var fs = require('fs');

function findFile(path, searchFile, callback) {
  // check for a match, given a stat
  function isMatch(err, stats) {
    if(err) { return callback(err); }
    if(stats.isFile() && file == searchFile) {
      callback(undefined, path+'/'+file);
    } else if(stats.isDirectory()) {
      statDirectory(path+'/'+file, isMatch);
    }
  }
  // launch the search
  statDirectory(path, isMatch);
}

// Read and stat a directory
function statDirectory(path, callback) {
  fs.readdir(path, function (err, files) {
    if(err) { return callback(err); }
    files.forEach(function(file) {
      fs.stat(path+'/'+file, callback);
    });
  });
}

findFile('./test', 'needle.txt', function(err, path) {
  if(err) { throw err; }
  console.log('Found file at: '+path);
});
The function is split into smaller parts:
- findFile: This code starts the whole process, taking the main input arguments as well as the callback to call with the results.
- isMatch: This hidden helper function takes the results from stat() and applies the "is a match" logic necessary to implement findFile().
- statDirectory: This function simply reads a path, and calls the callback for each file.
I admit this is fairly verbose.
PathIterator: Improving reuse by using an EventEmitter
However, we can accomplish the same goal in a more reusable manner by creating our own module (pathiterator.js), which treats directory traversal as a stream of events by using EventEmitter:
var fs = require('fs'),
    EventEmitter = require('events').EventEmitter,
    util = require('util');

var PathIterator = function() { };

// augment with EventEmitter
util.inherits(PathIterator, EventEmitter);

// Iterate a path, emitting 'file' and 'directory' events.
PathIterator.prototype.iterate = function(path) {
  var self = this;
  this.statDirectory(path, function(fpath, stats) {
    if(stats.isFile()) {
      self.emit('file', fpath, stats);
    } else if(stats.isDirectory()) {
      self.emit('directory', fpath, stats);
      self.iterate(path+'/'+file);
    }
  });
};

// Read and stat a directory
PathIterator.prototype.statDirectory = function(path, callback) {
  fs.readdir(path, function (err, files) {
    if(err) { self.emit('error', err); }
    files.forEach(function(file) {
      var fpath = path+'/'+file;
      fs.stat(fpath, function (err, stats) {
        if(err) { self.emit('error', err); }
        callback(fpath, stats);
      });
    });
  });
};

module.exports = PathIterator;
As you can see, we create a new class which extends EventEmitter, and emits the following events:
- “error” - function(error): emitted on errors.
- “file” - function(filepath, stats): the full path to the file and the result from fs.stat
- “directory” - function(dirpath, stats): the full path to the directory and the result from fs.stat
We can then use this utility class to implement the same directory traversal:
var PathIterator = require('./pathiterator.js');
function findFile(path, searchFile, callback) {
  var pi = new PathIterator();
  pi.on('file', function(file, stats) {
    if(file == searchFile) {
      callback(undefined, file);
    }
  });
  pi.on('error', callback);
  pi.iterate(path);
}
While this approach takes a few lines more than the pure-callback approach, the result is a somewhat nicer and extensible (for example - you could look for multiple files in the “file” callback easily).
If you end up writing a lot of code that iterates paths, having a PathIterator EventEmitter will simplify your code. The callbacks are still there - after all, this is non-blocking I/O via the event loop - but the interface becomes a lot easier to understand. You are probably running findFile() as part of some larger process - and instead of having all that file travelsal logic in the same module, you have a fixed interface which you can write your path traversing operations against.
Using a specialized module: async.js
Encapsulating the I/O behind a EventEmitter helps a bit, but we can do one better by using fjacob's async.js. This is a FS-specific library that encapsulates file system operations behind a chainable interface. The findFile() function can be written using async.js like this:
var async = require('asyncjs');
function findFile(path, searchFile, callback) {
  async.readdir(path)
    .stat()
    .filter(function(file) {
      return file.stat == searchFile;
    })
    .toString(callback);
}
The techniques behind async.js consist essentially of an object that acts like a series (from the chapter on Control Flow), but allows you to specify the operations using a chainable interface.
My point - if there is any - is that coordinating asynchronous I/O control flow in Node is somewhat more complicated than in scripting environments/languages where you can rely on I/O blocking the execution of code. This is most obvious when you are dealing with the file system, because file system I/O generally requires you to perform long sequences of asynchronous calls in order to get what you want.
However, even with file I/O, it is possible to come up with solutions that abstract away the details from your main code. In some cases you can find domain specific libraries that provide very conscise ways of expressing your logic (e.g. async.js) - and in other cases you can at least take parts of the process, and move those into a separate module (e.g. PathIterator).
13. Comet and Socket.io deployment
- present an overview of the techniques to implement Comet
- introduce Socket.io and a basic application
- discuss the complexities of real-world deployment with Socket.io
So... do you want to build a chat? Or a real-time multiplayer game?
In order to build a (soft-) real-time app, you need the ability to update information quickly within the end user's browser.
HTTP was not designed to support full two-way communication. However, there are multiple ways in which the client can receive information in real time or almost real time:
Techniques to implement Comet
Periodic polling. Essentially, you ask the server whether it has new data every n seconds, and idle meanwhile:
Client: Are we there yet?
Server: No
Client: [Wait a few seconds]
Client: Are we there yet?
Server: No
Client: [Wait a few seconds]
... (repeat this a lot)
Client: Are we there yet?
Server: Yes. Here is a message for you.
The problem with periodic polling is that: 1) it tends to generate a lot of requests and 2) it's not instant - if messages arrive during the time the client is waiting, then those will only be received later.
Long polling. This is similar to periodic polling, except that the server does not return the response immediately. Instead, the response is kept in a pending state until either new data arrives, or the request times out in the browser. Compared to periodic polling, the advantage here is that clients need to make fewer requests (requests are only made again if there is data) and that there is no "idle" timeout between making requests: a new request is made immediately after receiving data.
Client: Are we there yet?
Server: [Wait for ~30 seconds]
Server: No
Client: Are we there yet?
Server: Yes. Here is a message for you.
This approach is slightly better than periodic polling, since messages can be delivered immediately as long as a pending request exists. The server holds on to the request until the timeout triggers or a new message is available, so there will be fewer requests.
However, if you need to send a message to the server from the client while a long polling request is ongoing, a second request has to be made back to the server since the data cannot be sent via the existing (HTTP) request.
Sockets / long-lived connections. WebSockets (and other transports with socket semantics) improve on this further. The client connects once, and then a permanent TCP connection is maintained. Messages can be passed in both ways through this single request. As a conversation:
Client: Are we there yet?
Server: [Wait for until we're there]
Server: Yes. Here is a message for you.
If the client needs to send a message to the server, it can send it through the existing connection rather than through a separate request. This efficient and fast, but Websockets are only available in newer, better browsers.
Socket.io
As you can see above, there are several different ways to implement Comet.
Socket.io offers several different transports:
- Long polling: XHR-polling (using XMLHttpRequest), JSONP polling (using JSON with padding), HTMLFile (forever Iframe for IE)
- Sockets / long-lived connections: Flash sockets (Websockets over plain TCP sockets using Flash) and Websockets
Ideally, we would like to use the most efficient transport (Websockets) - but fall back to other transports on older browsers. This is what Socket.io does.
Writing a basic application
I almost left this part out, since I can't really do justice to Socket.io in one section of a full chapter. But here it is: a simple example using Socket.io. In this example, we will write simple echo server that receives messages from the browser and echoes them back.
Let's start with a package.json:
{
  "name": "siosample",
  "description": "Simple Socket.io app",
  "version": "0.0.1",
  "main": "server.js",
  "dependencies": {
    "socket.io": "0.8.x"
  },
  "private": "true"
}
This allows us to install the app with all the dependencies using npm install.
In server.js:
var fs = require('fs'),
    http = require('http'),
    sio = require('socket.io');

var server = http.createServer(function(req, res) {
  res.writeHead(200, { 'Content-type': 'text/html'});
  res.end(fs.readFileSync('./index.html'));
});
server.listen(8000, function() {
  console.log('Server listening at http://localhost:8000/');
});
// Attach the socket.io server
io = sio.listen(server);
// store messages
var messages = [];
// Define a message handler
io.sockets.on('connection', function (socket) {
  socket.on('message', function (msg) {
    console.log('Received: ', msg);
    messages.push(msg);
    socket.broadcast.emit('message', msg);
  });
  // send messages to new clients
  messages.forEach(function(msg) {
    socket.send(msg);
  })
});
First we start a regular HTTP server that always respondes with the content of "./index.html". Then the Socket.io server is attached to that server, allowing Socket.io to respond to requests directed towards it on port 8000.
Socket.io follows the basic EventEmitter pattern: messages and connection state changes become events on socket. On "connection", we add a message handler that echoes the message back and broadcasts it to all other connected clients. Additionally, messages are stored in memory in an array, which is sent back to new clients so that the can see previous messages.
Next, let's write the client page (index.html):
<html>
<head>
<style type="text/css">
#messages { padding: 0px; list-style-type: none;}
#messages li { padding: 2px 0px; border-bottom: 1px solid #ccc; }
</style>
<script src="http://code.jquery.com/jquery-1.7.1.min.js"></script>
<script src="/socket.io/socket.io.js"></script>
<script>
$(function(){
var socket = io.connect();
socket.on('connect', function () {
socket.on('message', function(message) {
$('#messages').append($('<li></li>').text(message));
});
socket.on('disconnect', function() {
$('#messages').append('<li>Disconnected</li>');
});
});
var el = $('#chatmsg');
$('#chatmsg').keypress(function(e) {
if(e.which == 13) {
e.preventDefault();
socket.send(el.val());
$('#messages').append($('<li></li>').text(el.val()));
el.val('');
}
});
});
</script>
</head>
<body>
<ul id="messages"></ul>
<hr>
<input type="text" id="chatmsg">
</body>
</html>
BTW, "/socket.io/socket.io.js" is served by Socket.io, so you don't need to have a file placed there.
To start the server, run node server.js and point your browser to http://localhost:8000/. To chat between two users, open a second tab to the same address.
Additional features
Check out the Socket.io website (and Github for server, client) for more information on using Socket.io.
There are two more advanced examples on Github.
I'm going to focus on deployment, which has not been covered in depth.
Deploying Socket.io: avoiding the problems
As you can see above, using Socket.io is fairly simple. However, there are several issues related to deploying an application using Socket.io which need to be addressed.
Same origin policy, CORS and JSONP
The same origin policy is a security measure built in to web browsers. It restricts access to the DOM, Javascript HTTP requests and cookies.
In short, the policy is that the protocol (http vs https), host (www.example.com vs example.com) and port (default vs e.g. :8000) of the request must match exactly.
Requests that are made from Javascript to a different host, port or protocol are not allowed, except via two mechanisms:
Cross-Origin Resource Sharing is a way for the server to tell the browser that a request that violates the same origin policy is allowed. This is done by adding a HTTP header (Access-Control-Allow-Origin:) and applies to requests made from Javascript.
JSONP, or JSON with padding, is an alternative technique, which relies on the fact that the <script> tag is not subject to the same origin policy to receive fragments of information (as JSON in Javascript).
Socket.io supports these techniques, but you should consider try to set up you application in such a way that the HTML page using Socket.io is served from the same host, port and protocol. Socket.io can work even when the pages are different, but it is subject to more browser restrictions, because dealing with the same origin policy requires additional steps in each browser.
There are two important things to know:
First, you cannot perform requests from a local file to external resources in most browsers. You have to serve the page you use Socket.io on via HTTP.
Second, IE 8 will not work with requests that 1) violate the same origin policy (host/port) and 2) also use a different protocol. If you serve your page via HTTP (http://example.com/index.html) and attempt to connect to HTTPS (https://example.com:8000), you will see an error and it will not work.
My recommendation would be to only use HTTPS or HTTP everywhere, and to try to make it so that all the requests (serving the page and making requests to the Socket.io backend) appear to the browser as coming from the same host, port and protocol. I will discuss some example setups further below.
Flashsockets support requires TCP mode support
Flash sockets have their own authorization mechanism, which requires that the server first sends a fragment of XML (a policy file) before allowing normal TCP access.
This means that from the perspective of a load balancer, flash sockets do not look like HTTP and thus require that your load balancer can operate in tcp mode.
I would seriously consider not supporting flashsockets because they introduce yet another hurdle into the deployment setup by requiring TCP mode operation.
Websockets support requires HTTP 1.1 support
It's fairly common for people to run nginx in order to serve static files, and add a proxy rule from nginx to Node.
However, if you put nginx in front of Node, then the only connections that will work are long polling -based. You cannot use Websockets with nginx, because Websockets require HTTP 1.1 support throughout your stack to work and current versions of nginx do not support this.
I heard from the nginx team on my blog that they are working on HTTP 1.1 support (and you may be able to find a development branch of nginx that supports this), but as of now the versions of nginx that are included in most Linux distributions do not support this.
This means that you have to use something else. A common option is to use HAProxy in front, which supports HTTP 1.1 and can thus be used to route some requests (e.g. /socket.io/) to Node while serving other requests (static files) from nginx.
Another option is to just use Node either to serve all requests, or to use a Node proxy module in conjuction with Socket.io, such as node-http-proxy.
I will show example setups next.
Sample deployments: scaling
Single machine, single stack
This is the simplest deployment. You have a single machine, and you don't want to run any other technologies, like Ruby/Python/PHP alongside your application.
[Socket.io server at :80]
The benefit is simplicity, but of course you are now tasking your Node server with a lot of work that it wouldn't need to do, such as serving static files and (optionally) SSL termination.
The first step in scaling this setup up is to use more CPU cores on the same machine. There are two ways to do this: use a load balancer, or use node cluster.
Single machine, dual stack, node proxies to second stack
In this case, we add another technology - like Ruby - to the stack. For example, the majority of the web app is written in Ruby, and real-time operations are handled by Node.
For simplicity, we will use Node to perform the routing.
[Socket.io server at :80]
  --> [Ruby at :3000 (not accessible directly)]
To implement the route, we will simply add a proxy from the Socket.io server to the Ruby server, e.g. using node-http-proxy or bouncy. Since this mostly app-specific coding, I'm not going to cover it here.
Alternatively, we can use HAProxy:
[HAProxy at :80]
  --> [Ruby at :3000]
  --> [Socket.io server at :8000]
Requests starting with /socket.io are routed to Socket.io listening on port 8000, and the rest to Ruby at port 3000.
To start HAProxy, run sudo haproxy -f path/to/haproxy.cfg
The associated HAProxy configuration file can be found here for your cloning and forking convinience.
I've also included a simple test server that listens on ports :3000 (http) and :8000 (websockets). It uses the same ws module that Socket.io uses internally, but with a much simpler setup.
Start the test server using node server.js, then run the tests using node client.js. If HAProxy works correctly, you will get a "It worked" message from the client:
$ node client.js
Testing HTTP request
Received HTTP response: PONG. EOM.
Testing WS request
Received WS message a
Received WS message b
Received WS message c
Received WS message d
Received WS message e
Successfully sent and received 5 messages.
Now waiting 5 seconds and sending a last WS message.
It worked.
Single machine, SSL, dual stack, static assets served separately
Now, let's offload some services to different processes and start using SSL for Socket.io.
First, we will use nginx to serve static files for the application, and have nginx forward to the second technology, e.g. Ruby.
Second, we will start using SSL. Using SSL will increase the complexity of the setup somewhat, since you cannot route SSL-encrypted requests based on their request URI without decoding them first.
If we do not terminate SSL first, we cannot see what the URL path is (e.g. /socket.io/ or /rubyapp/ ). Hence we need to perform SSL termination before routing the request.
There are two options:
- Use Node to terminate SSL requests (e.g. start a HTTPS server).
- Use a separate SSL terminator, such as stunnel, stud or specialized hardware
Using Node is a neat solution, however, this will also increase the overhead per connection in Node (SSL termination takes memory and CPU time from Socket.io) and will require additional coding.
I would prefer not to have to maintain the code for handling the request routing in the Node app - and hence recommend using HAProxy.
Here we will use stunnel (alternative: stud) to offload this work. Nginx will proxy to Ruby only and Socket.io is only accessible behind SSL.
[Nginx at :80]
  --> [Ruby at :3000]
[Stunnel at :443]
  --> [HAProxy at :4000]
    --> [Socket.io at :8000]
    --> [Nginx at :80]
      --> [Ruby at :3000]
Traffic comes in SSL-encrypted to port 443, where Stunnel removes the encryption, and then forwards the traffic to HAProxy.
HAProxy then looks at the destination and routes requests to /socket.io/ to Node at port 8000, and all other requests to Ruby/Nginx at port 3000.
To run Stunnel, use stunnel path/to/stunnel.conf.
The associated HAProxy and Stunnel configuration files can be found here for your cloning and forking convinience.
To make connections to port 443 over SSL, run the connection tests for the testing tool using node client.js https. If your HAProxy + Stunnel setup works correctly, you will get a "It worked" message from the client.
Multiple machines, SSL, dual stack, static assets
In this scenario, we are deploying to multiple machines running Socket.io servers; additionally, we have multiple machines running the second stack, e.g. Ruby.
For simplicity, I'm going to assume that a single machine is going to listen to incoming requests and handle load balancing and SSL decryption for the other servers.
Non-SSL traffic uses a slightly different HAProxy configuration, since non-SSL connections to Socket.io are assumed to be unwanted.
SSL traffic is first de-encrypted by Stunnel, then forwarded to HAproxy for load balancing.
[HAProxy at :80]
  --> Round robin to Ruby pool
[Stunnel at :443]
  --> [HAProxy at :4000]
    --> Round robin to Ruby pool
    --> Source IP based stickiness to Socket.io pool
The configuration here is essentially the same as in the previous scenario (you can use the same config), but instead of having one backend server in each pool, we now have multiple servers and have to consider load balancing behavior.
Load balancing strategy and handshakes
HAproxy is configured with the same (URL-based) routing as in the previous example, but the traffic is balanced over several servers.
Note that in the configuration file, two different load balancing strategies are used. For the second (non-Socket.io) stack, we are using round robin load balancing. This assumes that any server in the pool can handle any request.
With Socket.io, there are two options for scaling up to multiple machines:
First, you can use source IP based sticky load balancing. Source IP based stickiness is needed because of the way Socket.io handles handshakes: unknown clients (e.g. clients that were handshaken on a different server) are rejected by the current (0.8.7) version of Socket.io.
This means that:
- in the event of a server failure, all client sessions must be re-established, since even if the load balancer is smart enough to direct the requests to a new Socket.io server, that server will reject those requests as not handshaken.
- load balancing must be sticky, because for example round robin would result in every connection attempt being rejected as "not handshaken" - since handshakes are mandatory but not synchronized across servers.
- doing a server deploy will require all clients to go through a new handshake, meaning that deploys are intrusive to the end users.
Example with four backend servers behind a load balancer doing round robin:
[client] -> /handshake -> [load balancer] -> [server #1] Your new Session id is 1
[client] -> /POST data (sess id =1) -> [load balancer] -> [server #2] Unknown session id, please reconnect
[client] -> /handshake -> [load balancer] -> [server #3] Your new Session id is 2
[client] -> /POST data (sess id =2) -> [load balancer] -> [server #4] Unknown session id, please reconnect
This means that you have to use sticky load balancing with Socket.io.
The second alternative is to use the Stores mechanism in Socket.io. There is a Redis store which synchronizes in memory information across multiple servers via Redis.
Unfortunately, the stores in Socket.io are only a partial solution, since stores rely on a pub/sub API arrangement where all Socket.io servers in the pool receive all messages and maintain the state of all connected clients in-memory. This is not desirable in larger deployments, because the memory usage now grows across all servers independently of whether a client is connected to a particular server (related issue on GitHub).
Hopefully, in the future, Socket.io (or Engine.io) will offer the ability to write a different kind of system for synchronizing the state of clients accross multiple machines. In fact, this is being actively worked on in Engine.io - which will form the basis for the next release of Socket.io. Until then, you have to choose between these two approaches to scale over multiple machines.
Thank you for reading my book!
If you've made it this far, thank you.
If you liked the book, follow me on Twitter or on Github. I love seeing that I've had some kind of positive impact.
I'd like to talk at developer-centric Node-related events in SF, so get in touch if you're arranging one.